How to Create Typography Poster Enigma Using Photoshop
In this tutorial we will go through the process of making this typography poster called “Enigma” only using Adobe Photoshop. You will have a basic look into the 3D-Tool of Photoshop, how to texture and stylize your 3D Typography and how to make a shiny space background to create your own space-inspired text. This is my first tutorial and I hope you guys will enjoy it!
Note: This Tutorial is more for the advanced Artists, so if you are a beginner you should practice until you feel comfortable with photoshop and its tools. Note 2: Of course you can do this tutorial with other Photoshop Versions, but for this one CS5 is very recommended, because it has got functions which are not in other versions.
Final Image Preview

Stocks Used:
- Nebula Resource Pack
- Dageus Nebula Stock
- Aiden Nebula Stock
- Yosemite Waterfall
- Smoke Brushes
- Star Brushes 1
- Star Brushes 2
- Cloud Brushes 1
- Cloud Brushes 2
- Metal Texture
- Cracked Earth Texture
Step 1 – Starting
Creat a new document in Photoshop: 1680 pixels width and 1050 pixels high at 72 dpi, but If you would like to print out your works
you should use 300 dpi.

Now grab your Paint Bucket Tool (G) and fill your Background with black.
Step 2 – The Logo
Now it’s time to get creative. Get out a paper and draw yourself a cool logo. I decided to create my logo futuristically. This step will probably
cost you the most time, because you have to get some ideas for your typography first. Just try out different styles and see
which one is the coolest or which you like the most. And if you need some help just search for some sites like Pinterest or Behance there you will find awesome logo designs which can inspire you. After you finished your sketch, scan it and open it in photoshop.
Here is an image of my sketch.
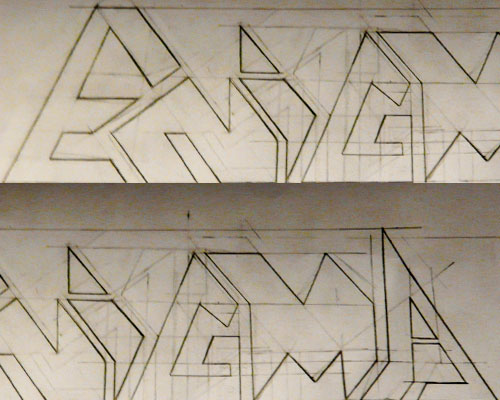
Most artists would probably open Illustrator now and start to recreate their Logo. But my problem was that I haven’t had Illustrator on
this Computer, so I decided to do it on Photoshop. So first of all create a new folder called “Logo Shapes” and grab the Pen Tool (P).
Now start to draw a path around your first letter and close the path, now right click and press “create vector mask”, fill the shape with
white.
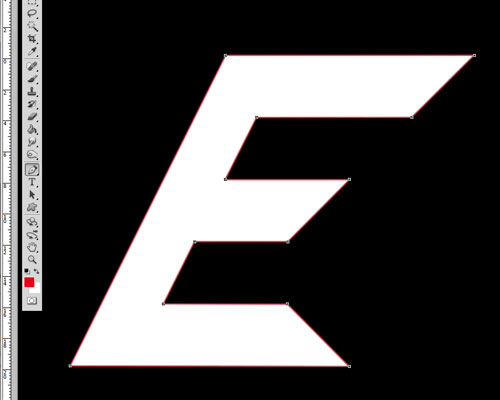
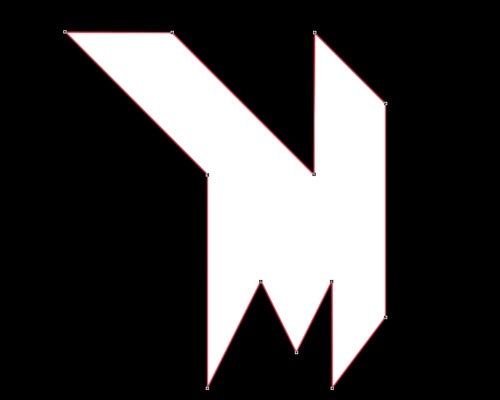
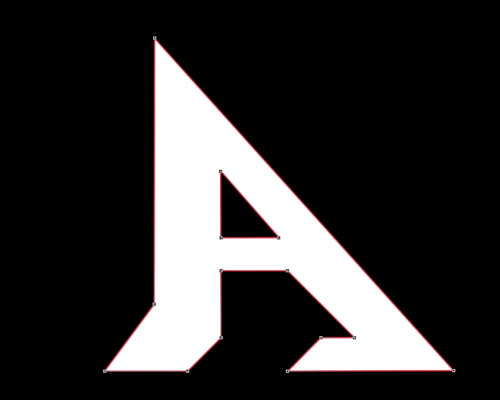
Do the same for the other letters until you have all shapes for your Logo.



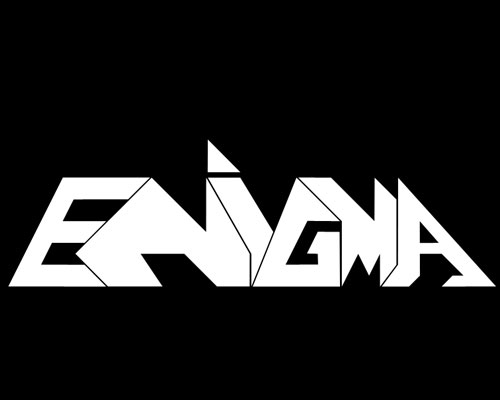
Step 3 – Using the 3D Tool
Okay, now that you’ve got your Logo, duplicate the folder “Logo Shapes” with all Layers and Rename the new folder into “Logo 3D”.
Make your folder “Logo Shapes” invisible by clicking on the little eye, next to the folder’s layer. Go to the “Logo 3D” folder and pick
your first letter (for me it is E), then go to “3D” -> “Repoussй” -> “Layer Mask” (for some it could also be “Selected Path”).
Pick the first “Repoussй Shape Presets” (of course you can try other shapes, but this was the one I picked).
Use the following settings:

Materials aren’t very important for this tutorial. Just let the “All” Material as it is. The “Front” Material should be the color of
your shape, which is white in this case. Bevel1/2 and Back aren’t important because you don’t see the sides anyway. The only important
thing here is the “Sides” Material which should be a dark color, just pick the one I did.
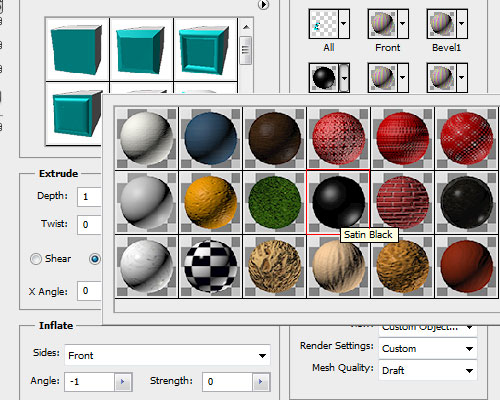
Your letter should now look like mine (below this text), don’t wonder why my letter is teal I just colored the shapes and it’ll get white
anyway when we have finished to transform our letters into 3D. Now that you have your first 3D Shape do the same with the others.
Note: If you have problems with the quality just click on the layer with the 3D and go to “Window” -> “3D”. Now choose “3D {SCENE} and
change the “Quality” to “Ray Traced Final”.
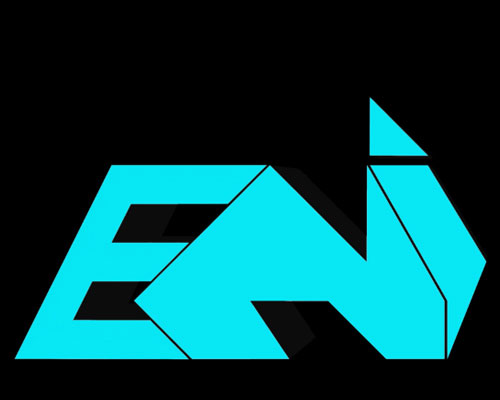

Step 4 – Style your Logo
Okay, now we’ll start to style our logo. Make the “Logo Shapes” folder visible again and put it above the Logo 3D folder. Duplicate the
“Logo Shapes” folder again, so that you’ve got now 3 folders. Name the new folder “Inner Styling”, this folder should be above the others.
Now open the folder and hold down the CTRL button, click on all the layers only in this folder and press your
right mouse button, then choose “Merge Layers”. You’ve got now a single layer with your logo. Rename this layer to “Inner Styling 1″ and
duplicate it again. Rename the new layer to “Inner Styling 2″, put it over the first Inner styling layer and make it invisible.
Right click on the “Inner Styling 1″ layer and choose “Blending Options”. Use the following settings:
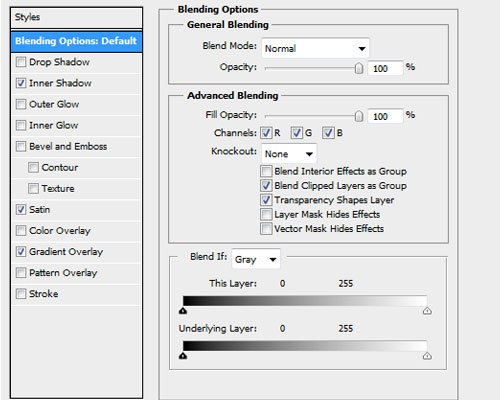
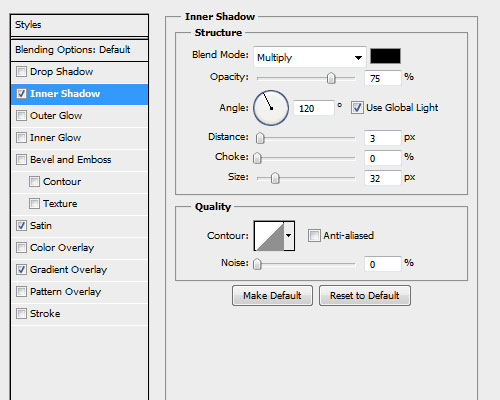
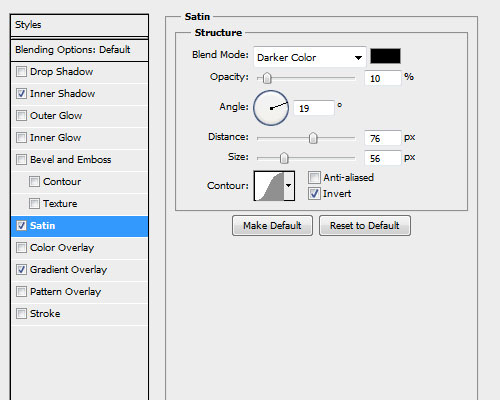

Your final Logo should look like this:

Make the “Inner Styling 2″ layer visible again. Right click on the little image of the layer and press “Select Pixels”. Now go to “Select”
-> “Modify” -> “Contract”, use 6 pixels, then go again to “Select” -> “Inverse” then press the “Del-Button” on your keyboard. Select the
pixels of the layer again but now grab your Paint Bucket Tool (G) and fill the layer with the color #6f6675.
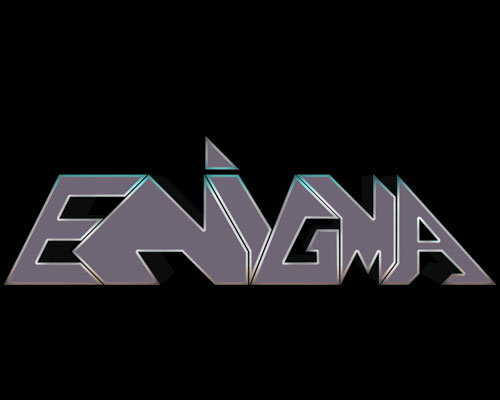
Right click on the “Inner Styling 2″ layer and choose “Blending Options”. Use the following settings:
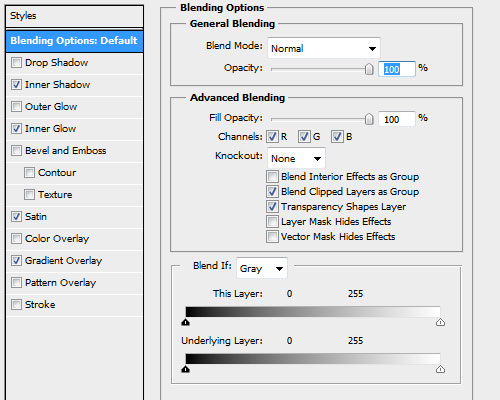

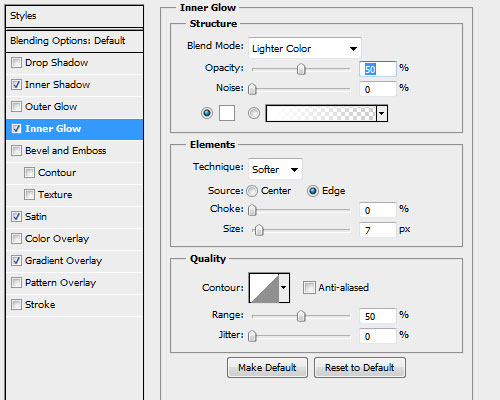


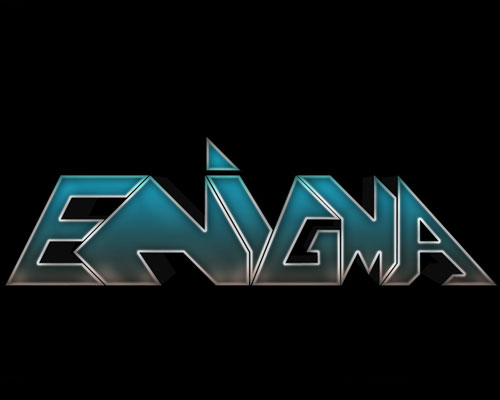
Your piece should look like this:

Now get out your Gradient Tool (G), just right click on the “Bucket” Icon. Then pick the colors #34b5cf (as Foreground Color) and
#574841 (as Background Color), create a new Layer and name it “Gradient”, on which you’ve to use the Gradient Tool, then right click on it
and choose “Create Clipping Mask”. Now create another layer and name it “Lightning”, again right click and “Create Clipping Mask”. Press
(B) to get out your Brush Tool and pick a 100px sized soft brush with 0% hardness. Now brush on the lower edges of your logo and set the
Opacity of the layer to 50%.
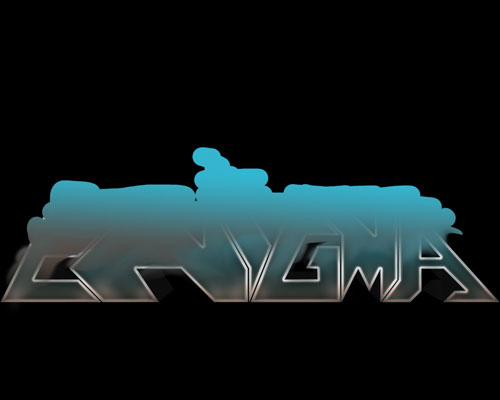
Create a new layer and name it “Coloring”, now pick again your brush tool (B) but this time use a 80 px sized, round, hard brush with 100%
hardness. Start coloring over your logo like I did. Then get your Gradient tool, create a new layer above the “Coloring” layer and fill it
with the same colors as the “Gradient” layer after that just merge the layerst into one. Now create a clipping mask with the “Coloring”
layer, so that your “Inner Styling 2″ has got now a total of 3 clipping masks. You will probably notice that the colors now doesn’t look
very continuous, to avoid that just use the Smudge Tool and smudge your layer as long as it looks good (also use the eraser with the
strength of 20% to erase some parts of the color).
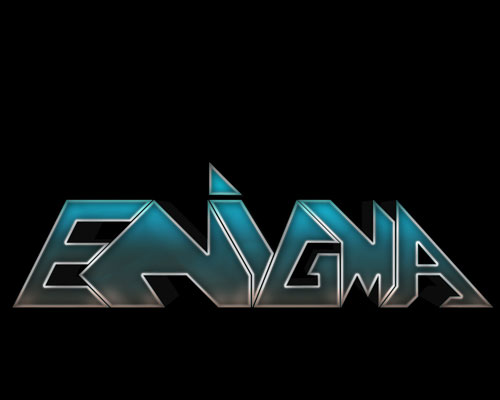
After that right click on the “Coloring” layer and pick “Blending Options”. Use the following Options:
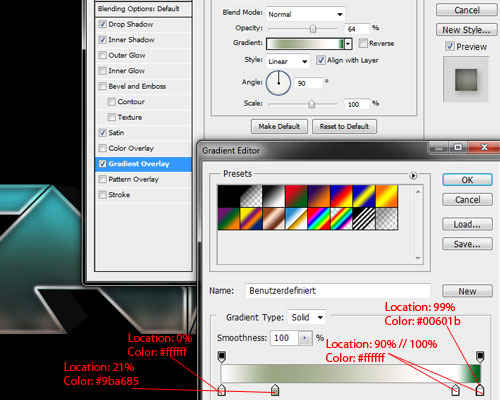


Go back to your “Logo 3D” folder and duplicate it, put the folder under the “Inner Styling” folder and name it “Other Styling”. Hold
down CTRL and pick all layers in that folder, now right click on any of the layers and choose “Convert to Smart Object”. Now you should
have got one layer with the logo, name that layer “Styling 1″. Create another one and name it “Styling 2″ create a clipping mask with it.
Get out the Gradient Tool and fill the layer with these Gradient Options:

It’s time to create the Shadows. Zoom into your Picture (about 300%) and get out the Pen Tool (P), then draw a path around the area of the
“styling 2″ layer as I did to add some shadows with the Burn tool (O) (be sure to darken the area with the edge a little stronger). Set
the “Range” (in the upper bar of Photoshop) to Midtones and the Exposure to 50%.
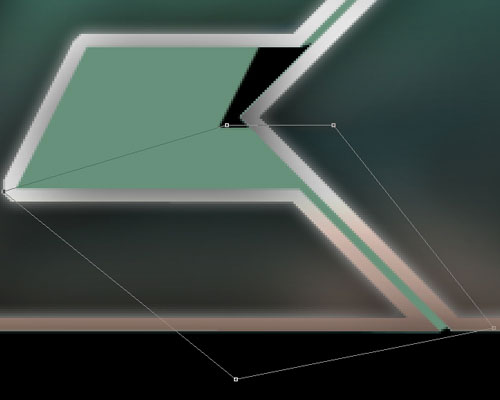
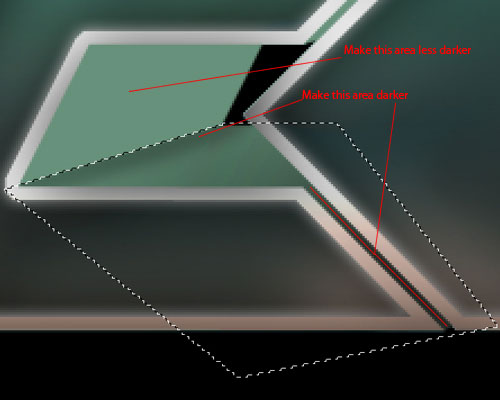
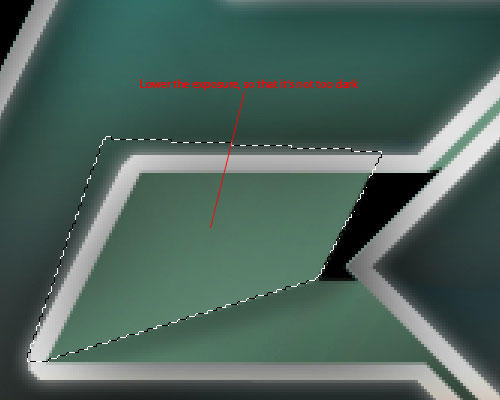
Now repeate that Step until you have darken all the areas.
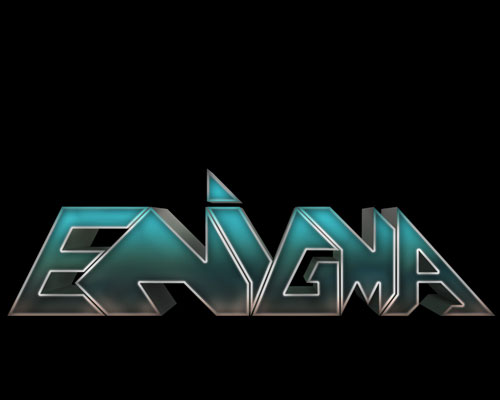
When you’re done make the folders “Logo 3D”, “Logo Shapes” and the background invisible. Create a new layer above all folders, name it
“Final Logo” and press CTRL + ALT + ShIFT + E. Make the Background visible again and the “Inner Styling” + “Other Styling” invisible.
Now right click on the “Final Logo” then “Blending Options”. Use the following settings:

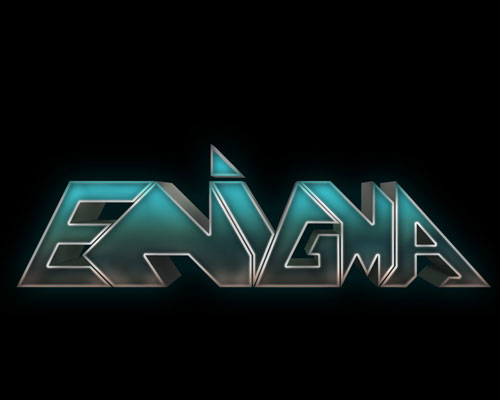
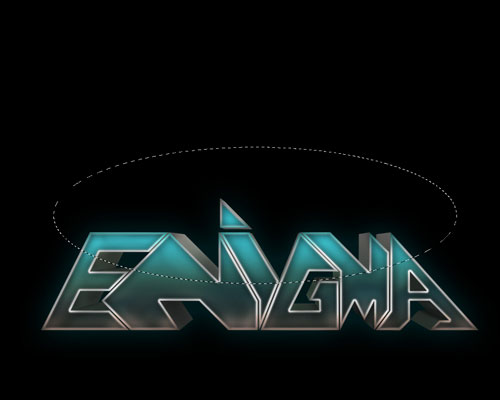
Create a clipping mask above the “Final Logo” layer, then take out the “Elliptical Marquee Tool” (M) and create a circle on the upper part
of the logo then fill it with white and set the Opacity to 5%, erase parts which don’t look good.
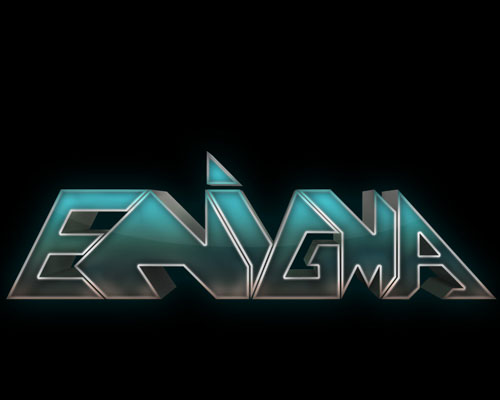
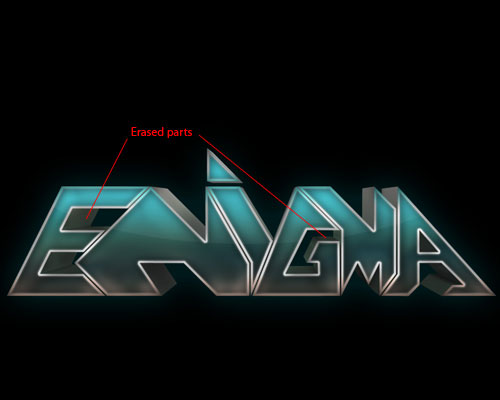
Step 5 – Using textures
Create a new folder and name it “Effects and others” then put the “Final Logo” layer in it. Now open the metal texture, put it over the Final
Logo layer and create a clipping mask (if the image is to small just duplicate it several times), set it on soft light, 50% opacity and erase any
parts you don’t like.
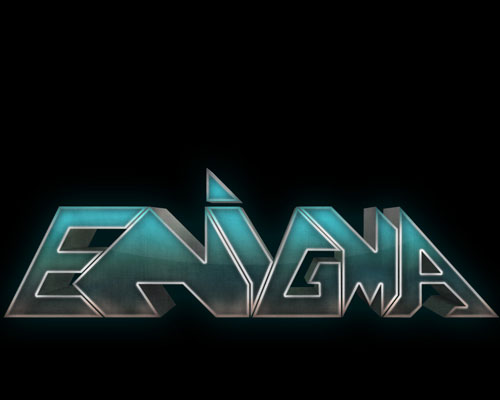
Create again a new folder and name it “Adjustments”.
-Curves:
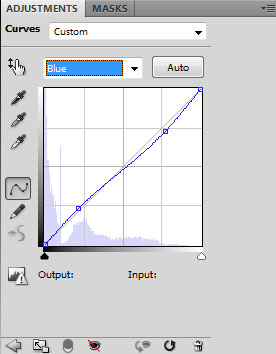
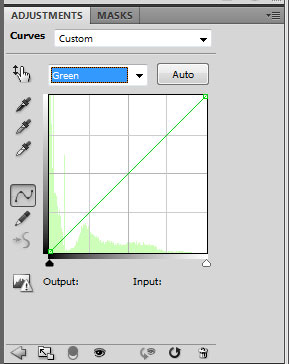


-Channel Mixer:

-Channel Mixer 2:

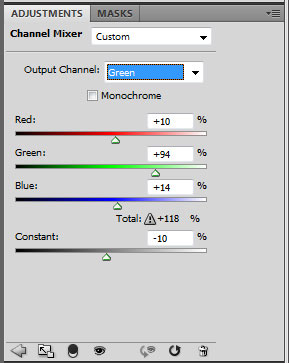

-Curves 2:
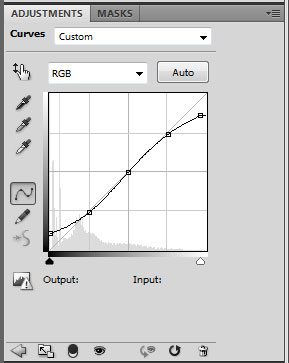
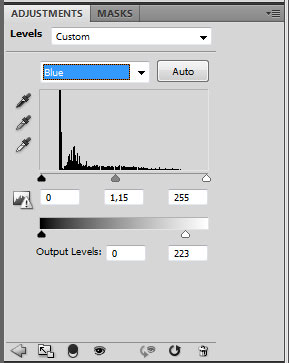
-Levels:

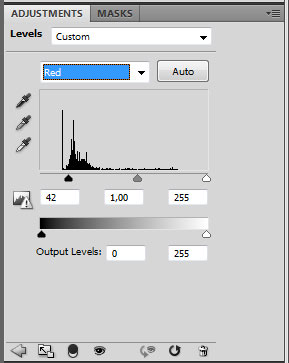
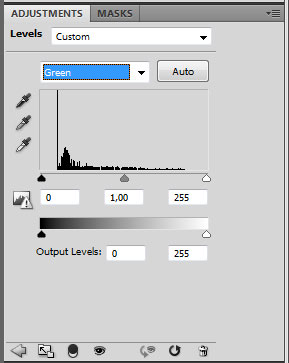
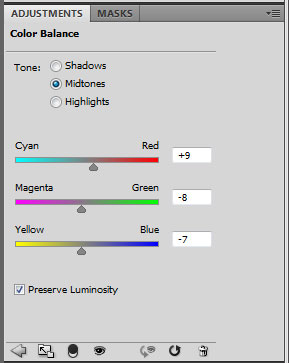
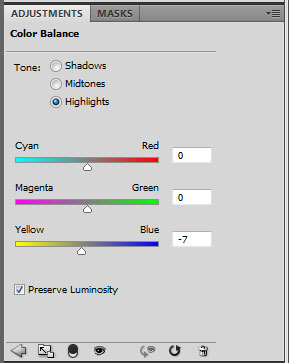
-Color Balance:

-Gradient Map:

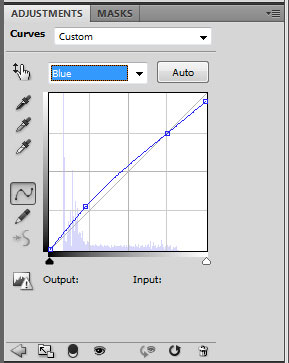
-Curves 3:

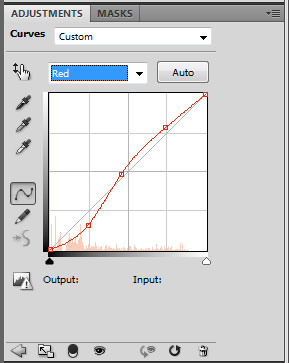


Go back to the “Effects and others” folder, then open the cracked earth texture and paste it above the metal texture. Press (V) to take
out the Move Tool, be sure that “Show Transform Controls” is activated in the upper bar, then press ALT + SHIFT to make the texture
smaller. Now copy the texture 2 or 3 times and move it over the logo then pick all the layers with the texture and merge them to one, then
add a Hue/Saturation (as a clipping mask) to the texture with the following settings:

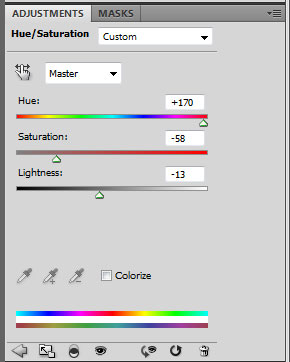
Now merge the Hue/Saturation layer with the texture layer and then create a clipping mask onto the “Final Logo” layer, set it on
Vivid Light 80%. Take your Eraser Tool (E) and erase parts which don’t look good, try to play with the Opacity of the Eraser and also
zoom into the picture to have a better look into small areas.
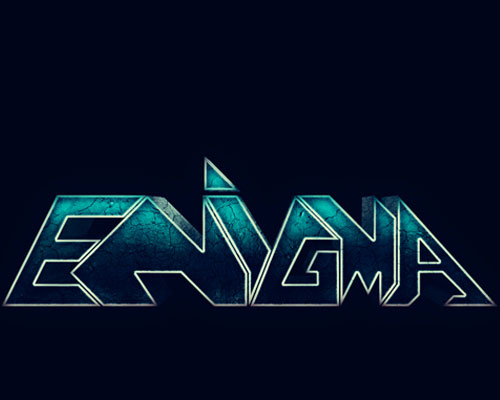
Create a new folder under the “Effect and others” folder and name it “Background Styling”. Create a new layer and take out your Brush tool.
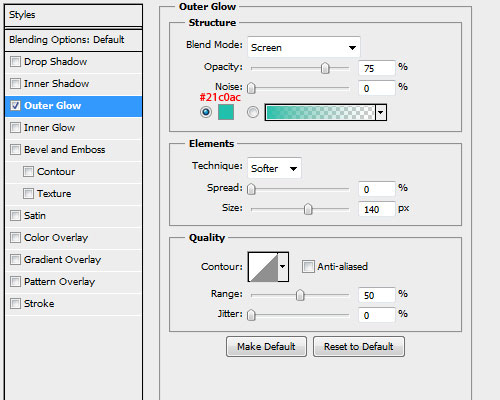
Now brush with a hard, 950px sized brush a black circle behind the logo, then right click and choose blending options. Use the following
settings:
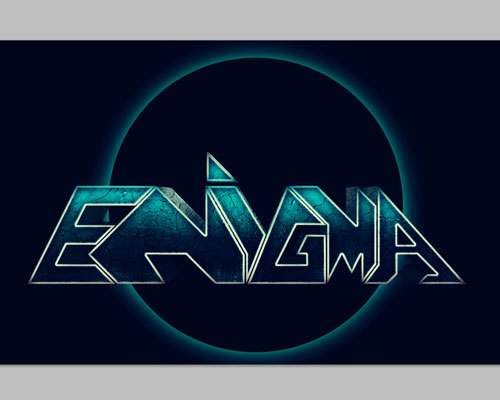
On a new layer you brush now with a 900 px sized, soft brush in the middle of the black circle, with a color that
fits well to your picture. I used #00d4b9. Now set the Opacity to 50%.

Get out the smoke brushes and brush them behind the black circle.

Brush with a round, hard, 500 px sized brush two circles behind the black one, then use a round, soft, 500px sized brush with the eraser
tool and erase the middle of the circles until they get nearly invisible.

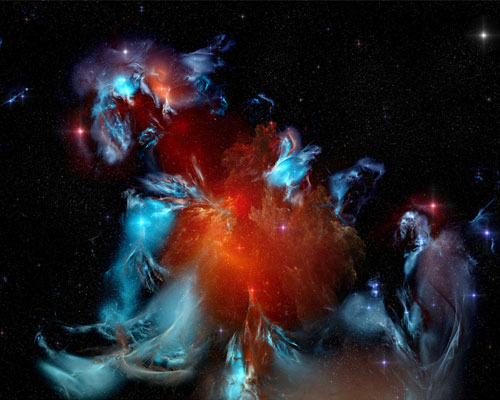
Create a new folder under the “Circles” layer and name it “Space”. Open the nebula stock (which you can see below) and paste it in your
picture. Make it smaller, set it on “Lighten” and move it around until you think it looks nice, then duplicate it, rotate it and
place it again somewhere where it looks nice. Erase parts which you don’t like.
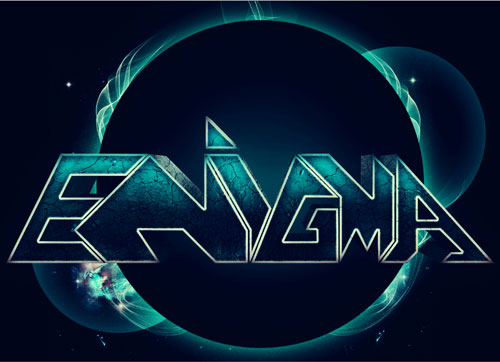
Open the other Nebula Stock and do the same as before, but this time set the opacity on 50%. Note: Before you paste the Nebula Stock into
your image use Hue/Saturation to color it blue. You don’t have to do that, but I did it because it looked way better then the original
color.




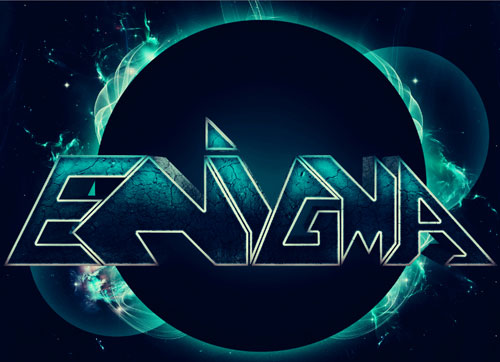
Now open the last Nebula Stock and repeat the steps. Set this one on Lighten 100%.


Go back to the “Background Styling” folder and create a new layer above the others. Now brush with the star brushes some details into the
background. Note: The “Lightdots” which you see in the preview are in the star brushes pack which you can download from the link
in the beginning of the tutorial.
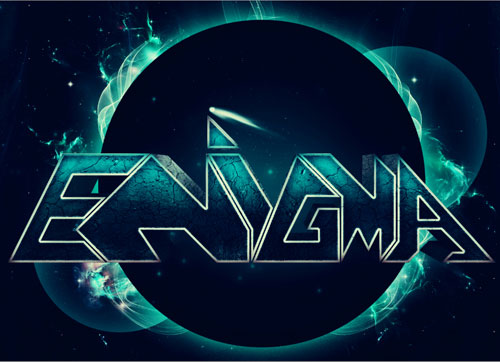
Go back to the “Effects and others” folder. Now create a rectangle on a new layer with the Rectangular Marquee Tool (M). Pick white as your
foreground color, then pick the Gradient Tool (G) and make sure that in the upper bar, the gradient goes from white to trasnparent. Fill the rectangle with some white, but not too much.

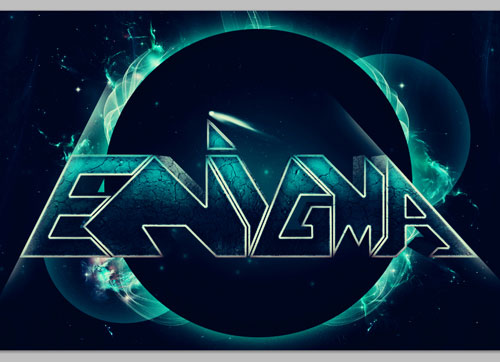
Now duplicate the layer and place it on the edge of your first and last letter, rotate it if necessary. Then erase some parts of the layers
so that you don’t have the 90 degree angle anymore.
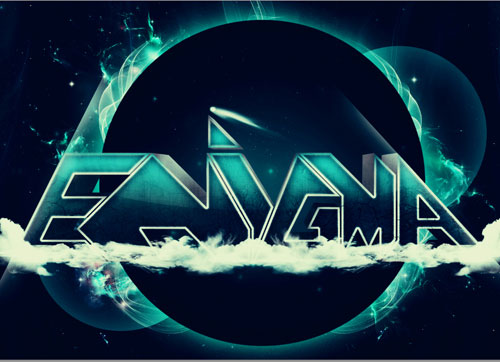
Set white as your foreground color and start to brush with the Cloud brushes infront of the logo. Be sure to use more then one
layer, so that you can move every cloud to the perfect position. Now just merge the layers into one and name it Clouds.
I did it that way: I just brushed infront of the half logo then I duplicated the final clouds layer, flipped it horizontally and moved it a
little so that it looked nice.
Note: As you will maybe notice the brushes aren’t that strong, so be sure to brush a cloud more then one time at the same position.


Duplicate the “Clouds” layer, move the duplicated layer under it and name it “Cloud Shadows”. Now right click, blending options then go to
“Color Overlay” and pick black, Normal on 100% Opacity. Now go to Filter -> Blur -> Gaussian Blur. Set the Radius to 5,0 pixels. Then lower
the opacity to 50%.


Duplicate the “Clouds” layer again, but this time move it under the “Final Logo” layer. Move it a little bit up, then get out your Eraser and
erase parts which don’t look good.
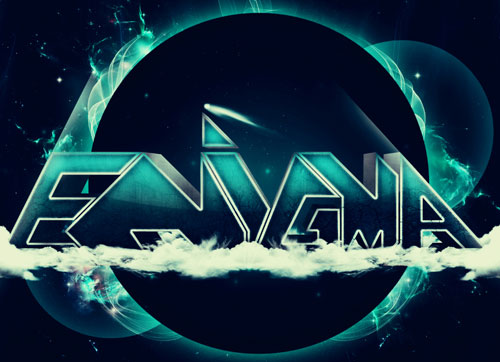
Now it’s time to add a little waterfall into the “A” letter. Open the waterfall stock, press to get out the Lasso Tool (L) and then draw a selection around the waterfall.

Now go to Select -> Modify -> Feather and set the Radius to 50 pixels then right click on the image -> Layer via cut. Copy the waterfall
layer and paste it above the final logo layer. Make the waterfall layer smaller, so that it fits well with the “A” and move it into the “hole”
of the “A”. Now set the layer on Lighten and erase parts which don’t look good.

Step 7 – Final Step
Merge all layers to one by pressing CTRL + ALT + SHIFT + E, then copy the layer and set it on screen 30%.

Now use the following Adjustments:
-Selective Color:
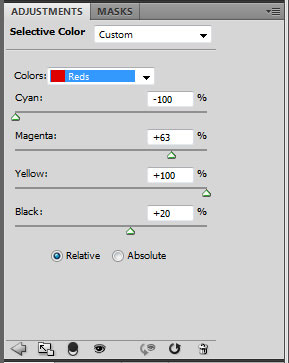
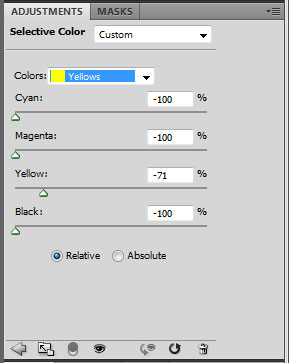

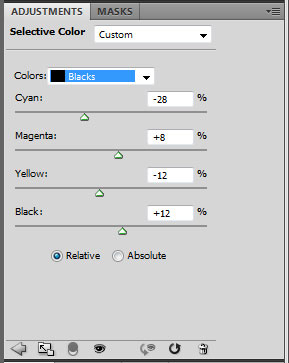
-Levels:

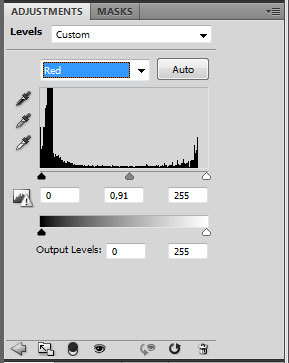
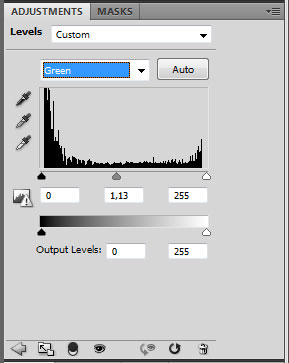
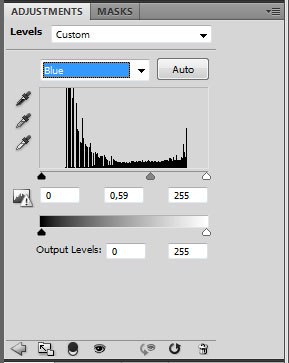
-Color Balance:
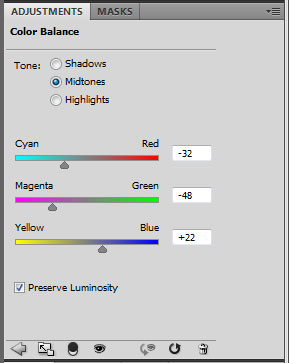
Create a new Layer and fill it with this color: #fbfcae . Set the layer on soft light 22%.
Create another layer but this time use the color: #d41a9d . Set the layer on lighten 19%.
-Channel Mixer:
Just go to Output Channel, pick green then blue and set everything on 0%. Then go to Red in the Output Channel and set red on 100% everything
else on 0%.

CTRL + ALT + SHIFT + E, then go to Filter -> Sharpen -> Sharpen. Erase parts which don’t look good. Now again CTRL + ALT + SHIFT + E and go
to Filter -> Other -> High Pass, Radius 10 pixels. Set the layer on Darker Color 20% and you’re done! I hope you liked the tutorial and learned
some new techniques. Don’t forget that you don’t have to follow the tutorial 1:1, try experiment in the Steps with things that are not in the
tutorial and maybe your final result will look then even much better!
Final Result: Enigma Poster

You have learnd How to Create Typography Poster Enigma Using Photoshop We’re churning through the many styles of Type – but is there anything in particular that you’d like to see? Don’t hesitate to give us in the comments below, or on Twitter / Facebook.


