


Photoshop Rage Virus tutorial
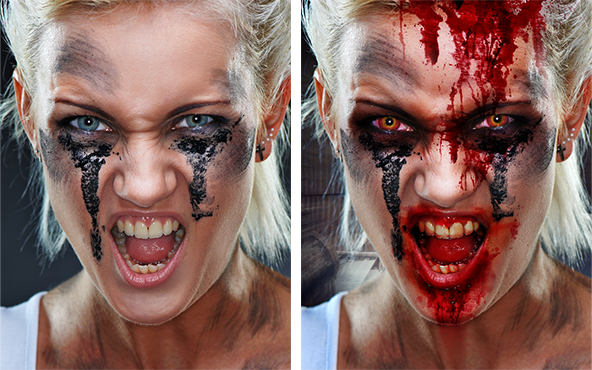
We are very excited to kick off a brand new TERROR SEASON for 2017, here new Horror Tutorials !! To get things started, we have a deliciously vicious Rage Virus walkthrough, inspired by the infected ‘sprinters’ from the 28 Weeks Later franchise. These guys aren’t dead, but they certainly are angry, and want to eat your FACE!! Read on for the lowdown for creating your very own Rage Virus composite..
THE CONCEPT
28 Weeks Later is an awesome Viral Apocalypse flick that introduced frenzied running hordes to the Zombie genre.. The infected from this series aren’t dead, so their physical appearance is less ‘decomposition’ and moreso red-infused rage. This walkthrough will cover stylised iris effects for blood-red eyes, muting the white tones of teeth, accentuating ridges of the face and hardcore blood splatter effects.
THE STOCK
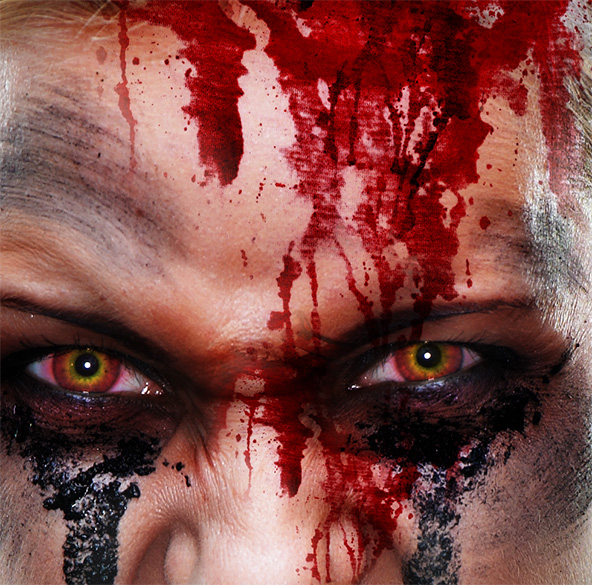
To get the ball rolling, find a suitably angry stock image from your site of choice. I chose a premium image from Fotolia, as Im a sucker for hi-resolution stock (#30980558 © Alexander Trinitatov ). There’s a fair selection on DeviantArt , so bounce over there if you’re not feeling the premium route. Boy or girl, it doesn’t matter
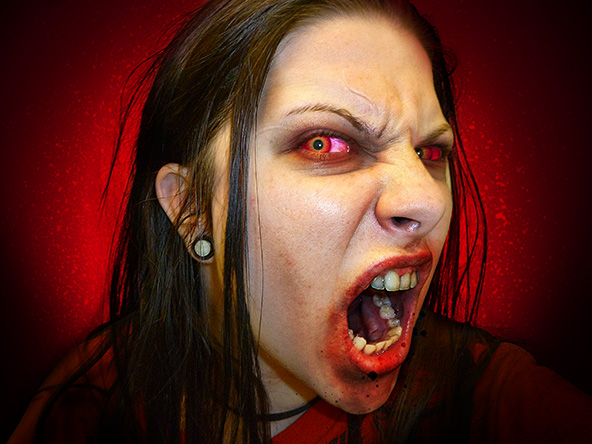
Here’s a look at the practice piece I done, using a free stock image by SMK11 ‘Face Ref 10′ (DeviantArt) :
RAGE EYES
To kick off proceedings, we’ll add some fire to the eyes of the stock model. If your chosen model has very dark brown eyes, you may want to lighten them up a notch using the technique shown in the Evil Eyes Walkthrough.
Create a new layer above the stock model image ( Cmd / Ctrl, Shift + N ). Change the layer mode from Normal to Overlay, and use a Soft-Edged Brush (B) to paint the entire iris with a deep red tone:

Set your brush width to a size just a little bit bigger than the model’s pupil, you can use the square brackets on the keyboard to do this quickly [ ]. Stay on the same layer, and select a rich yellow / orange colour from the colour picker. Position the Soft-Edged Brush (B) directly over the pupil and click about 3 – 4 times; this will have the orange / yellow tone taper out nicely from the centre:
At this stage, you can use the Eraser Tool (E) to remove the colour from the pupil, this may be particularly necessary if you are using a lower resolution image ( keeps the white ‘specular’ highlights sharp ).
Here’s what that paint work looks like, when the layer mode is set to Normal, illustrating what you’d like to achieve:
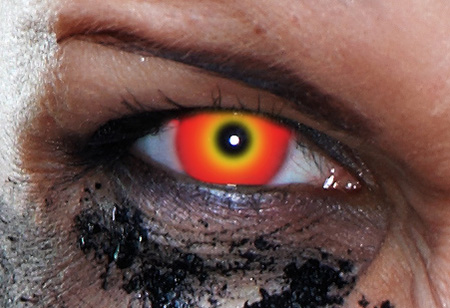
You can create another layer set to Overlay and go to work on the whites of the eyes for added effect:

INCREASE THE ANGER
There’s a number of techniques that can be used to accentuate the existing furrows, folds and creases of the model’s face, to intensify the sense of anger and rage.. A firm favourite of mine is to paint manually, on a new layer set to Soft-Light.
To add dark tones to the creases on the model’s face, create a new layer ( Cmd / Ctrl, Shift + N ), and set this layer to Soft Light. Use a Soft-Edged Brush (B) ( Hardness 0% ) set to Black, and manually paint wherever you would like the dark tones to be exaggerated. In this before / after example you can see how the eye sockets have been darkened using this technique:
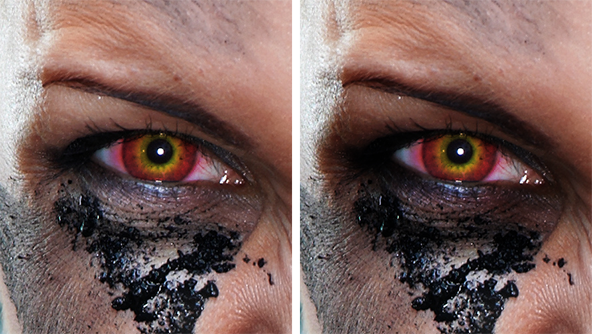
Why use Soft-Light layer mode? Well Soft-Light is one of the few layer modes that will retain the little highlights and speculars underneath.. If you were to undertake this same process with Multiply, you will annhilate these details, and that’s when stuff starts to look really ‘fake’.
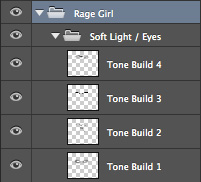
Continue to work around additional areas of the face using this technique; you may need to create new layers to build up the effect incrementally. At times you will need to use a very large Eraser with 0% hardness to taper back and blend the tones for a smoother transition. This image illustrates the before and after this tonal build-up:

The example piece required four layers of build-up with Soft-Light layers to achieve this effect. You’ll notice from the screen shot that I use Layer Groups , you should too!! Makes life infinitely easier:
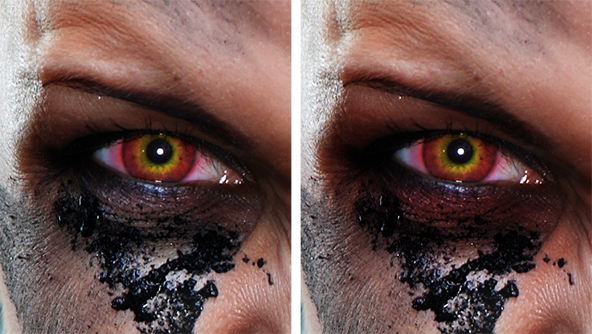
To add just a touch more ‘anger’, I added a new layer to the example piece, and set it to ‘Overlay’. Using a red tone, and a large Soft-Edged Brush (B), some red was added to the regions around the eyes:
..MORE CREASES PLS
Here’s a great method to increase the definition of creases and other details, using a ‘non-destructive’ burning method. What we do is create a new layer filled with 50% gray, change the layer mode to Soft Light, and then burn using this layer instead of directly to the pixels. Here’s how it’s done:
1. Create a new layer ( Cmd / Ctrl, Shift + N )
2. Select All ( Cmd / Ctrl + A )
3. Select Edit > Fill > Use: 50% Gray
4. Change this new layer, to Soft-Light Layer Mode
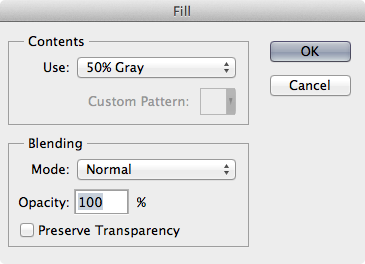
When you change this layer to Soft-Light, the grey becomes completely invisible, but will allow your burn effects to show through. Select the Burn Tool (O) and brush over any creases or lines you’d like to accentuate. Here’s an example of this ‘Burn Layer’ being used to rough up the edges of the teeth and the gums:
For the example piece, the Burn Tool (O) was set to around 50% Exposure, and 15px brush thickness.
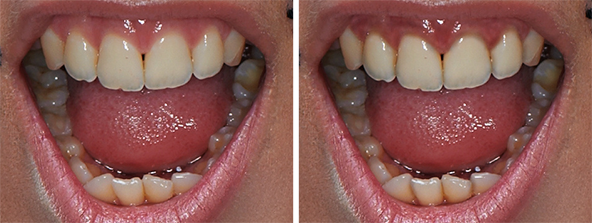
GNARLY TEETH
In most instances the model’s teeth will be ‘too white’ to carry off the infected look. You may want to add a new Levels Adjustment Layer , and bring those white tones down to pick out the grimey details. If you are unfamiliar with Adjustment Layers, check out our overview and get to grips with this way of working as soon as humanly possible!!
For the example, the levels were tweaked ( black and midrange sliders pulled to the right ), and then the effect selectively applied to the teeth using the adjustments Layer Mask . I’d like to break down this element step by step, but we have plenty in our library to cover these bases.. failing that, why not take the full course ?
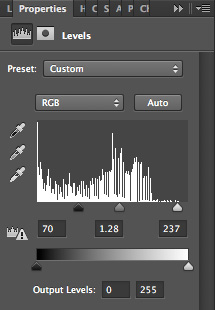
Before and after our Levels Adjustment:
RED RAW FACE
You can easily make the regions around the mouth look ‘red raw’ using a Levels Adjustment Layer set to Soft Light. This is a great technique, because it ramps up the existing details for a very sore looking infected mouth.
Create a new Adjustment Layer by clicking the circle icon at the bottom of the layer stack. Push the black and midtone sliders to the right, and then change the Adjustment Layer’s mode to Soft-Light.

Click on the Adjustment Layer’s Mask, and Invert to black ( Cmd / Ctrl + I ) ( this completely hides the effect ). Using a large Soft-Edged Brush (B) set to white, selectively paint in the ‘crust areas’. You can duplicate the Adjustment Layer to build up the intensity of the ‘soreness’ progressively. Here’s three stages of this build up, also illustrating the two Adjustment Layers used:

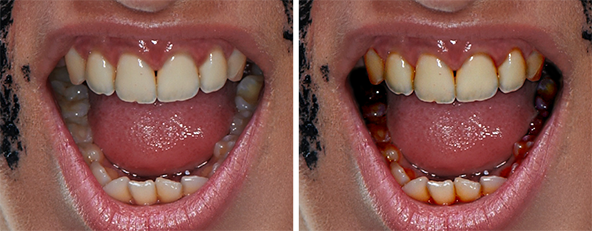
WET BLOOD
For the teeth / mouth area, the blood needs to have a very wet quality, as opposed to the dry / caked blood of the face. To achieve this effect, a blood brush set by dark-dragon-stock (DeviantArt) ( click to get the set ) was used.
To add your ‘wet blood’, create a new layer and set the mode to Overlay. Using your wet blood brush set, use a dark red tone as your foreground colour and paint directly onto the teeth using the various brushes from the set. You can also use the Smudge Tool for creating extra smears and transitions if necessary:

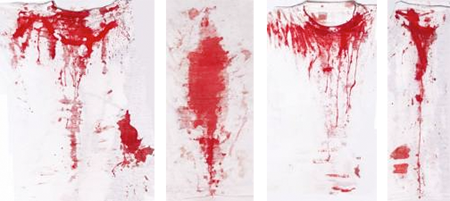
CRUSTY BLOOD
We use a slightly different technique for the facial blood as it has a more crusty quality. Head on over to CGTextures.com and check out their fantastic selection of ‘ Fabric Splatters ‘ ( registration required, but it’s free!! ). Because of the texture, these splatters have a very rough / tactile quality that works awesome in manips like this:
Paste your fabric texture into your document, and change it’s layer mode to Multiply. This eradicates the whites and allows the deep reds to show through. In some instances you may need to use Levels ( Image > Adjustments > Levels ) to get rid of some of the fabric details, by pulling the ‘white slider’ to the left a bit.
Use Layer Masks on these blood layers to remove areas not needed.. you can also use the Transform controls ( Cmd / Ctrl + T ) to rotate and scale the blood into position as necessary:

Repeat this process to build up the ‘blood crust’, so there is more variation and it seems less flat. With some blood layers, you can use Levels to make the blood much much darker, which really adds to the effect:
GRAGGAHGHGHH
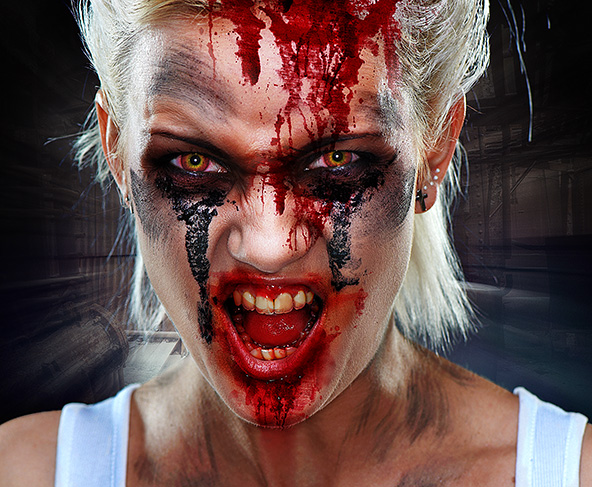
Repeating this blood process for the mouth, that will do it!! Here you can see the entire piece with a dramatic new background, in it’s rage-filled glory:
REVIEW
Huzzah!! One down, three more to go for 2017′s TERROR SEASON here at TutsPs. To check all of our other grisly walkthroughs, be sure to check out our Horror Section. Do you like this way of working? Why not check out our FULL photo manipulation course at: Photomanipulation Photoshop.


