


Create an Awesome Grass Texture in Photoshop
This tutorial will combine much of what we learned about in the first three installments, we will also go over some new techniques, and add some finishing touches that pull the whole look together.
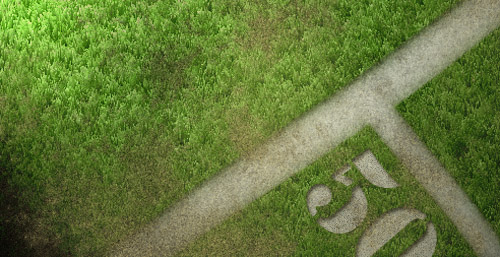
Preview of Final Result:
Onward, to the Tutorial…
Bring up Photoshop and create a new document at a size that you like. I used 500px by 500px
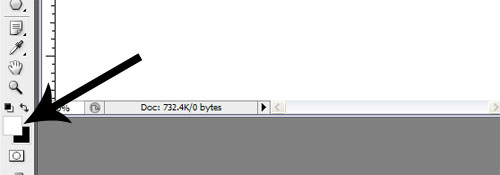
The first thing we need to do is make a dirt background to show through from underneath the grass we will create. Set your foreground and background colors to black and white. A shortcut for this is to restore Photoshop’s color defaults by pressing ‘d’ on your keyboard
Rename the background layer you are working on, call it dirt, or something applicable. (We will be using a couple layers in this tutorial so this will help organize things.

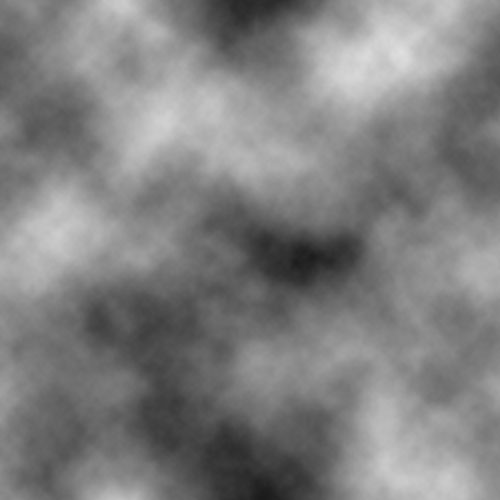
Go to the toolbar at the top and click on Menu > Filter > Render > clouds. This will give us a nice base to work from.
Add some noise and interest to our dirt. Click Menu > Filter > Noise > Add noise. Change the amount to 44%, the distribution to gaussian and make sure monochromatic is checked on. (All these types of settings are merely suggestions, it’s by tweaking these settings, that you will really begin to get a grasp on Photoshop filters.)

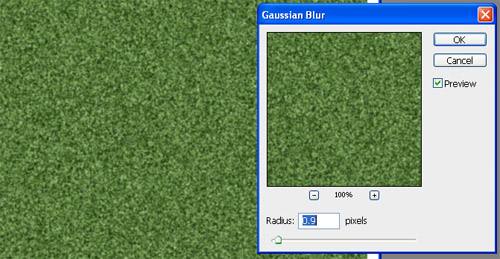
Add a gaussian blur to the dirt layer. Click Menu > Filter > Blur > Gaussian blur. Set the radius to 0.9 pixels.

Let’s add one more filter to this dirt layer. Click Menu > Filter > Brush strokes > Splatter . Set the spray radius to 21 and the smoothness to 2.

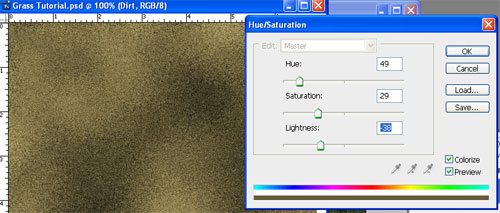
Now we need to give the dirt layer it’s color. Click Menu > Image > Adjustments > Hue/saturation. Make sure to check preview and colorize. Then change the setting to a nice brown. I used: Hue: 49, Saturation: 29, Lightness: -38. Click OK.
OK, we are now finished with the dirt layer. That gives us a nice texture and color underneath the grass we are about to create. Let’s start on the grass. Create a new layer and name it “Grass.”
Change your background color to a grassy color green, I used, #52782F. Hit ‘ctrl, backspace’ to fill your current layer (Grass) with the green color you selected.
Add some noise to your new grass layer. Click on Menu > Filer > Add noise > Noise. Choose 30% for the amount, gaussian for the distribution, and check monchromatic. Click OK.

Blur the grass layer. Click Menu > Filter > Blur > Gaussian blur. Change the radius to 0.9 pixels, click OK.
We are getting closer, but it still doesn’t look a whole lot like any grass I’ve ever seen. We can use a couple of wind filters to lengthen the grass and simulate the look of blades. Click Menu > Filter > Stylize > Wind, and change the settings to: method, stagger and direction, from the right. Click OK.

That looks a little better, but grass doesn’t grow all in one direction. So we need to add a little more direction and interest to our layer. First click Menu > Image > Rotate canvas > 90CW . Click OK.
We are going to repeat the last two steps now, but go in the opposite direction. So go to Menu > Filter > Stylize > Wind again and choose stagger, from the left. Click OK.
Now flip the image so the grass looks verticle. Click Menu > Image > Rotate canvas > 90 CCW . Below is what I’ve got so far…

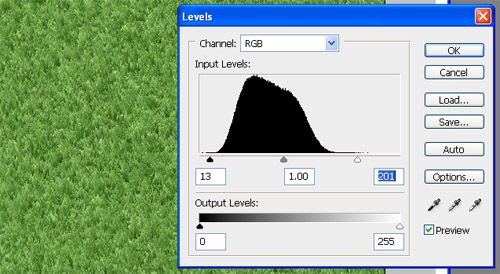
I think this grass could use a little more contrast. Change the levels by clicking Menu > Image > Adjustments > Levels. Drag the white and black sliders towards the middle till you get the variance you are after. Click OK.
This is already a pretty useful grass texture, but we are going to take this tutorial a bit further. If all you need is the grass, you may want to jump down to the steps on masking to reveal some of the dirt layer underneath. Otherwise, stick with these steps to add some lines to our field of grass to make it look like a football field. First off create a new layer, make sure you add it to the top of the layers (ie above Dirt and Grass), and name this layer Lines.
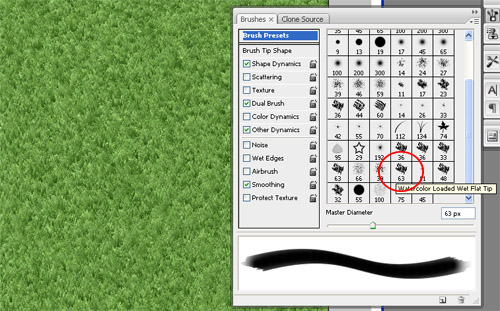
Grab the brush tool (‘b’ is your keyboard shortcut). Open up you brushes palette, Menu > Window > brushes or “F5”. Locate and click on your watercolor loaded brush 63 (shown in the image below). This is a cool Photoshop brush with some rough edges.
Change your foreground color to white. Start somewhere in the bottom left and click and drag toward the right side. You may have to try a couple times (if you are like me) to get a straight enough line. If you mess up just hit ‘ctrl+z‘ on the keyboard to undo the brush stroke you drew.
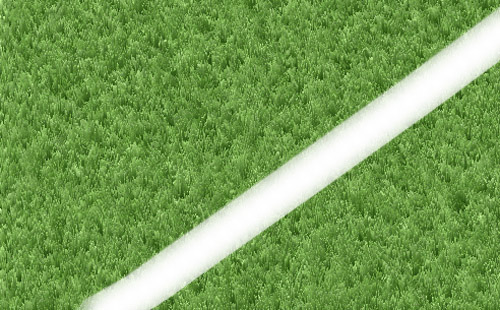
Use the same brush but scale the width down to about 45 pixels, either by pressing the ‘[‘ on the keyboard or locating the size options in the properties box at the top for brushes. Make a line perpendicular to the first line you drew, going from that line to the bottom right hand corner.

Add noise to the lines. Click Menu > Filter > Noise > Add noise. I used 11% for the amount.
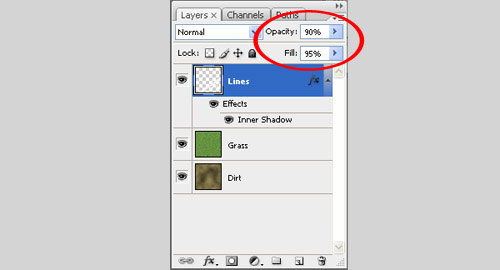
We should make the lines look like they are painted into the grass so we are going to add a subtle inner shadow. Double-click next to the name in the layer palette (if you are following along it should be lines), this will bring up the layer style dialog box. Check inner shadow and change the opacity to 60, the distance to 4 and the size to 4. Click OK.

The lines are starting to make sense on the field, but let’s try to blend them even more so. Change the opacity to 90 and the fill to 95.
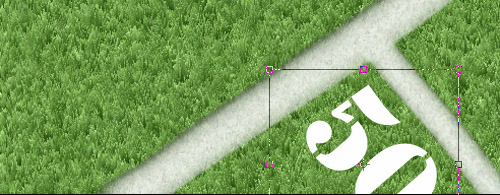
Now we are going to put the 50 yard marker on the field. Click on the text tool and in the properties for the text tool at the top of the screen, change your font to a stencil type font. I used ‘stencil std’ but you can use whatever you think works best. Just a quick side note, their are many really good free font sites out there, one of my favorites is www.dafont.com . Change the font size to something like 72 (we can adjust the size later) and the color to white. Now click anywhere on the field itself with the text tool still selected. This will create a new layer at the top of the layers for us. Now type 50.
Hit ‘ctrl, t’ on the keyboard to bring up the free transform tools. Hover over the middle of the 50 and click and drag it into the correct area. Then resize it to your liking by clicking and dragging any of the corners out (if you’d like to keep the proportions hold shift down while you drag). Finally, rotate the angle to the way you’d like. Hover over a corner until you get a double arrow with an arch for the curser, then click and drag.
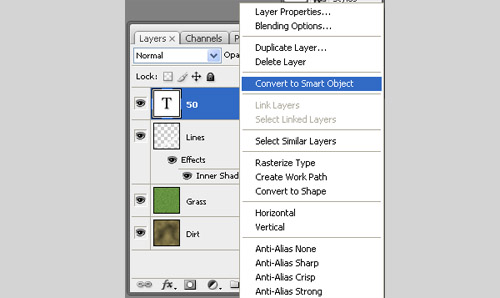
Convert the 50 layer to a smart object by right clicking (ctrl click on the mac) on the layer and selecting convert to smart object. This will allow us to handle this layer just like the others, in this case we need to add a filter. Keep in mind that once you convert a text layer to a smart object you lose the ability to change the text.
Now we add the same amount of noise to this layer as we did with the lines. Because the last filter we used was noise, all we have to do is click Menu > Filter > Add noise
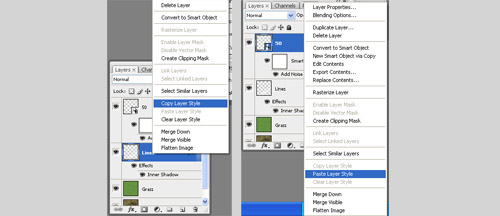
Next up, we need to put the inner shadow on the 50 layer. Right click on the Lines layer and choose copy layer style. Then right click on the 50 layer and choose paste layer style. This will copy and paste the same layer style properties to the 50.
That looks pretty cool, but their are a couple more things we can do. First off, we still have a dirt layer underneath, that we’d like some part of showing through. Let’s put all the layers besides the ‘Dirt’ on their own. Click on the 50 layer, then with the shift key held down click on the grass layer to highlight everything but the dirt layer. On the keyboard hit ‘ctrl, shift, alt, e’. This will place all these layers on top by itself. Rename this layer ‘Field’. Then hide 50, Lines and Grass layers by clicking on the eyeball icons near each one. All that should be showing now is ‘Field’ and ‘Dirt’.
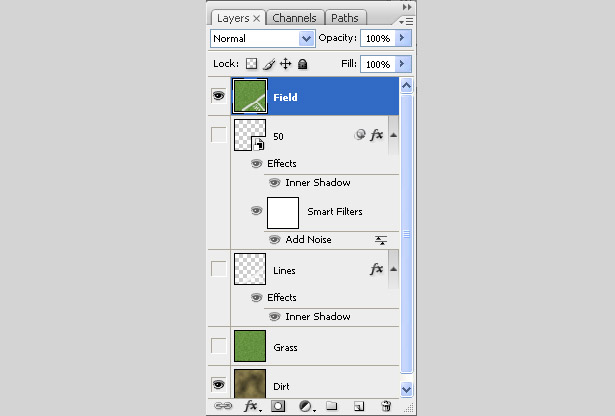
Add a layer mask to the ‘Field’ layer, by clicking the mask icon at the bottom of the layers palette.
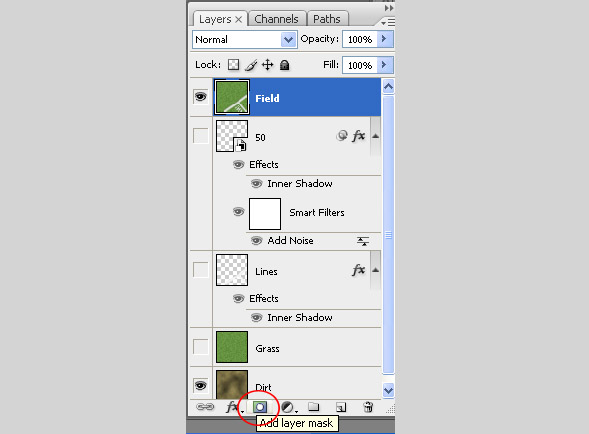
Now we will paint on the layer mask to reveal some of the dirt layer underneath. Change the foreground color to black. (Black reveals and white hides).
Grab the brush tool again and open up your brushes window. Now click on the small arrow shown below to reveal all your brushes you have. Grab your favorite grunge brush set and click OK. If you don’t have grunge brushes, you can play around with what may work. However, I would suggest you head on over to bittbox , deviantart or PsdGold to find some grunge brushes you can use, they will come in handy often. Then place the brushes into your Photoshop brushes for use, you can learn some more about that and creating your own in this article .

Now that you have a grunge brush you like begin painting black on the mask of the ‘Field’ layer to reveal the dirt layer underneath. Subtle dabs here and there work best, don’t overdo it, however if you do, you can always paint white back on the layer mask (which is the joy of using them :))
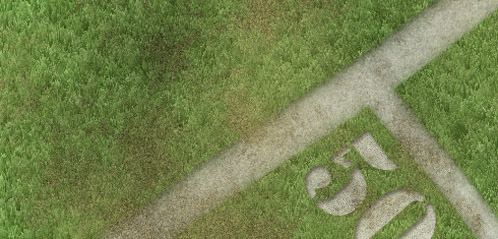
Their is one more thing I did on mine to help the overall feel of a field with lights, and that is a nice lighting effect. Click back to the field layer, not the mask, and click Menu > Filter > Render > Lighting effects. The defaults for spotlight aren’t bad, but play around with the sliders and the spotlight thumbnail on the left side. When you like the preview click ok. Below are the settings I used.

That’s pretty much it. I finished my field off by playing with the levels to increase the contrast and cropping the image to make it more horizontal. I hope this gives you a good idea of the power of filters in Photoshop. If you come up with an interesting variation, I’d love to see it, send me an email . Below is my finished field.


