


CORE SKILLS: PHOTOSHOP ADJUSTMENT LAYERS
Working in Photoshop, much like other art forms, is a constant process of tweaking and adjustment. Testing different colour schemes, contrast intensity and other amendments is a trial and error journey; you’ll find that you try hundreds of variations to reach a desired goal. Making these changes via the Image > Adjustments menu means you are applying your chosen adjustment directly to the pixels of your work, which isn’t ideal as it damages the colour information of your image.
Repeatedly applying adjustments in the manner above degrades image integrity, and doesn’t allow you the full freedom to experiment and tweak, which is customary in Photoshop work. Fortunately there are Adjustment Layers which will allow you to apply an adjustment on its own layer and amend the values any time you want. This method of working is ‘non-destructive’ meaning you can make as many changes as required without distorting pixel information. The added benefit is that you are afforded much more control as you can amend the adjustment’s opacity, use a mask, change the layer blend mode or even remove the adjustment completely later down the line.
CREATE AN ADJUSTMENT LAYER
Creating an adjustment layer is straightforward, simply click the black and white icon as shown below, and select the adjustment you require from the pop-up menu. A dialog box will appear for your chosen adjustment, tweak the values as required and hit OK .
The Adjustment that you apply will appear as it’s own layer – and as with other layers you can hide / show the layer, amend the opacity, change it’s position in the layer stack and change it’s layer blend mode.
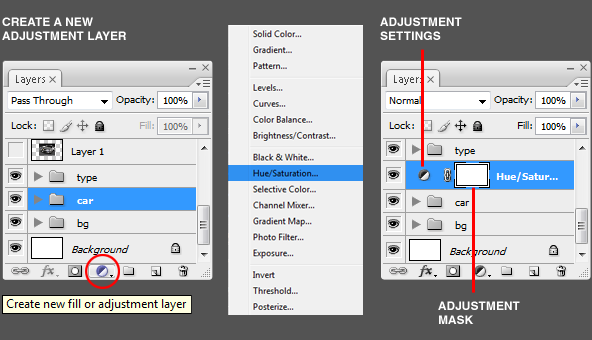
EDITING ADJUSTMENT SETTINGS
Any time you decide you want to change the values of your Adjustment settings, double click the black and white icon on the Adjustment Layer (labelled ‘adjustment settings’ , above) – this will bring up the adjustment dialog box allowing you to amend the settings.
ADJUSTMENT LAYER MASK
Personally, this is my favourite aspect of Adjustment Layers – the ability to selectively apply your adjustment effect using a layer mask. All adjustment layers automatically have a layer mask in place , the basic premise for working with layer masks is that white reveals and black erases. By default the layer mask is white, so everything shows through 100% – painting on the mask with black would remove the effect wherever the strokes are.
Check out the examples below to see how the blacks and whites of the layer mask effect the adjustment’s visibility on the image:
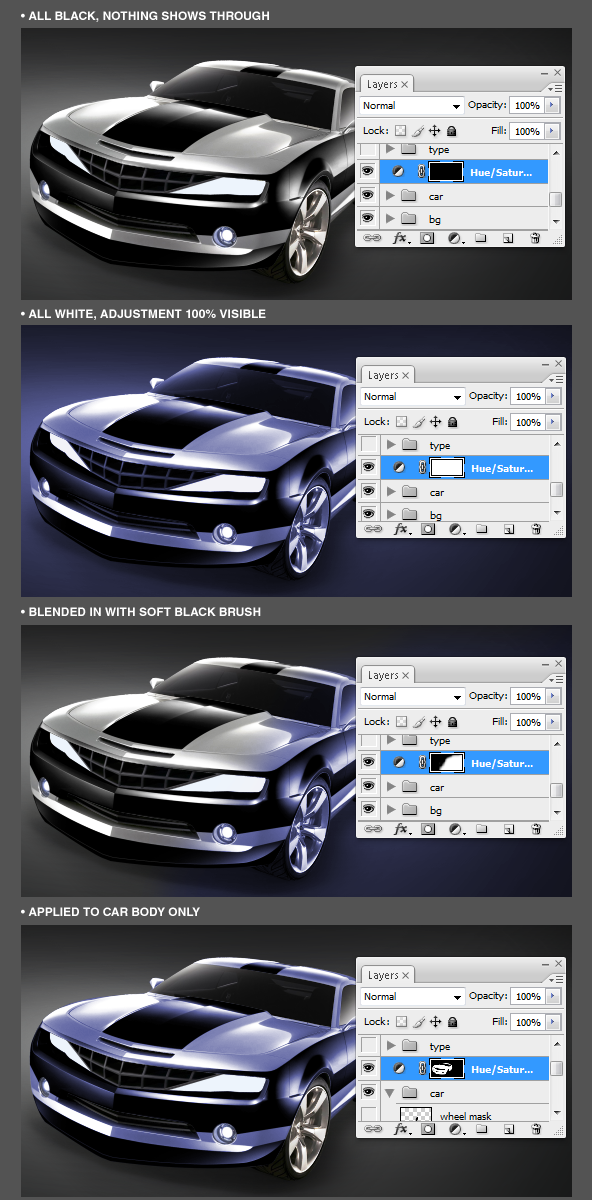
Once you understand the basic premise of working with Layer Masks you can get more creative by using grays to achieve varying shades of intensity. You can also create selections with the Pen Tool and fill them with white or black if you require an extra level of precision with your layer mask (as shown above where the mask was applied to the car body) .
REVIEW
As with the other Core Skills, Adjustment Layers are one of the essential Photoshop features – getting them into your workflow right from the outset will aide your manipulation work immensely. The added control, functionality and non-destructive nature means they play a key part in the photo manipulator’s arsenal.
Feel free to share your thoughts below and re-tweet if you enjoyed the article.


")


")
