


PEN TOOL BACKGROUND REMOVAL
Isolating items with clarity and finesse isn’t solely a fine-art pursuit in Photoshop, professional background removal is a common undertaking in the world of Digital Design. As it is a fundamental process, it’s well worth employing the best technique possible; and in my humble opinion, the Pen Tool is king. Due to it’s bezier nature, it’s a tricky one to get to grips with, but once learnt, becomes indispensable.
THE PEN TOOL
We touched upon the Pen Tool briefly in an earlier, introducing it’s basic uses to create precise selections. In this installment we’re building upon these techniques and combining the Pen Tool with Layer Masks to perform background removals.
In our earlier Background Removal with Layer Masks tutorial , we used brushes to ‘paint away’ the background. The Pen Tool method however is infinitely more precise, and also a much faster technique once mastered.
FAST N’ CLEAN
Many would argue their preferred method works fine, and I’d agree to a certain extent; but there are many situations where you require a lot more precision. For instance, if you were tasked with isolating curved / circular objects such as a beach ball, you will find that your polygonal lasso technique becomes long and arduous. The Pen Tool will not only tackle this problem with a few clicks, but also produce a flawless result.
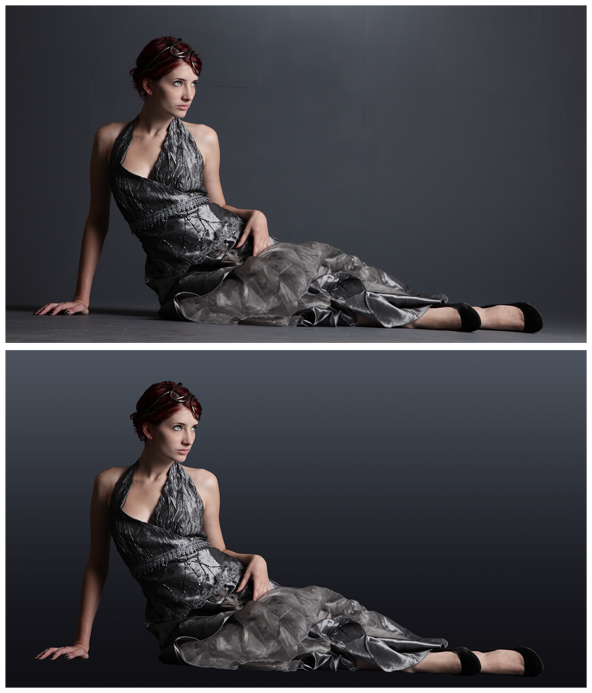
The example piece we are working with is Grey on Grey 1 by mjranum (DeviantArt) – a great figurative pose, shot on an even background. Above is the before and after, as you can see the isolated version is clean, with no degradation on the edges.
SETTING UP
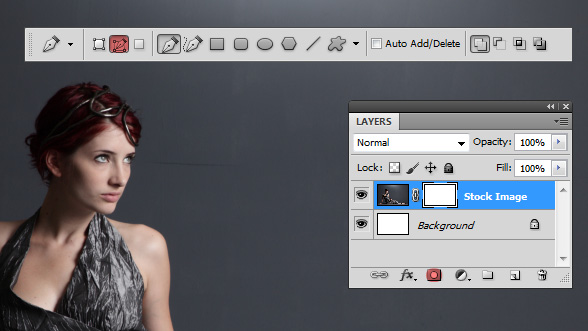
Paste your selected image into a new document, the stock layer you are working with needs to be on a new layer above the background. As we are using a layer mask, you will need to add a Layer Mask to the stock layer ( Layer Mask icon highlighted red below ). To activate the Pen Tool, hit P – or alternatively select the Pen Tool icon in the tools palette. You need to ensure that the Pen is set to ‘paths’ – you can check this in the tool settings, usually found at the top left of the screen ( Pen Tool paths, highlighted red below ):
CHOPPING OUT THE BACKGROUND
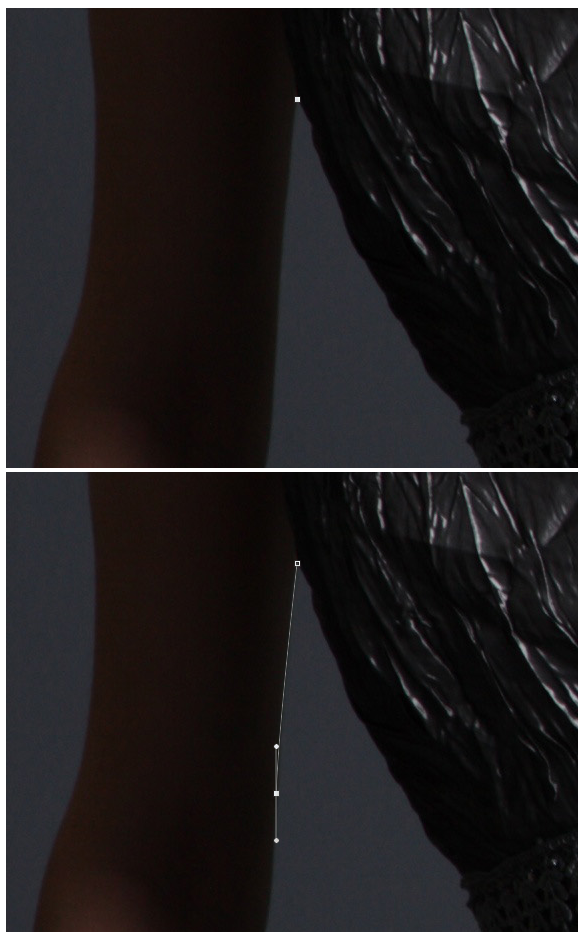
A common mistake made is to work on the stock image as opposed to the Layer Mask, so ensure the Layer Mask is active by clicking on it ( will show a thin black border, see above ). We are going to create a closed path, which will then be filled with black; chopping out a section of the image. Using the Pen Tool (P), click a point on the edge of the object. Click another point further down the edge, but this time hold down the left mouse button when you click – this will allow you to contort the line to fit the curve of the object:
ESSENTIAL KEYS
There are two keyboard shortcuts that are essential to modify the path when you work. The first is Ctrl / Cmd – holding down this key allows you to move the ‘anchor points’, the small squares of the path. Holding Ctrl / Cmd also allows you to tweak the ‘handles’ – these are the two lines that come off the anchor point, moving these will change the curvature of the path you are making. The second essential key to use is Alt. When creating paths, there are many instances where you don’t require a ‘curve’ for the next point, in this cases you hold down Alt and click an anchor point, which turns off the curvature for the next point.
To the un-initiated, the above may sound like garbled nonsense – have a practice and then the concepts will start to make sense.. If your a visual person like me, maybe checking out our video tutorial will help to clarify things.
..AND BACK TO IT
Instead of creating a huge path around the object, it’s a lot nicer to chip away in increments – so for the example Im going to create a smaller path and fill it with black:
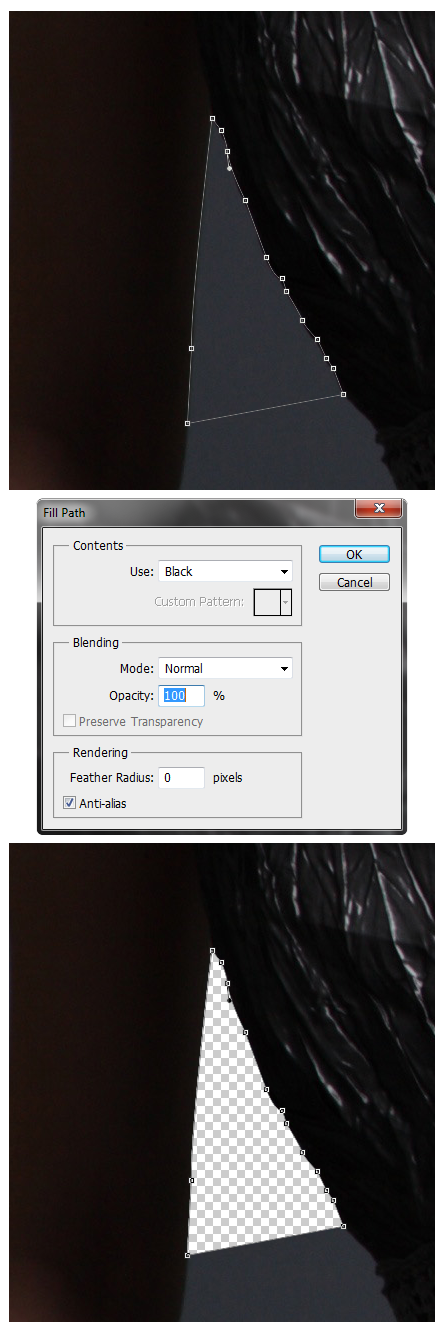
You must ensure a path is ‘closed’ before you are able to fill with black – do this by connecting the last point to the first. Once the path is closed, right click on the path and select ‘Fill Path’ – you will see a dialog which will give you fill options, select ‘Black’ from the dropdown. Once this is complete, right click on the path and select ‘delete path’. For the example I turned off the background layer, so in the pic above you can see the transparent background showing through.
So how does this work..? We have created a precise selection using the Pen Tool and filled with black, as it is on a Layer Mask the black reduces the opacity of this area to 0%. The explanation is actually a lot more complex than the process itself, but bear with me on this one!
RINSE AND REPEAT
Using the techniques above, chop away the background by creating paths, modifiying with Ctrl / Cmd and Alt where necessary and then filling the paths with black. What initially may seem like a long winded workflow actually becomes an extremely efficient method of isolating objects, with practice you’ll find yourself gliding around an image with speed and finesse.
Some additional shortcuts.. There’s a couple of keys that really assist productivity; as you will be zoomed in close, it is worth using the spacebar and mouse to pan around as you work and use the Ctrl / Cmd + – to zoom in and out where necessary.

REVIEW
This is how the pros do it, give it a whirl.. Using the Layer Mask gives you full editorial control, so you can always fix any mistakes later down the line. Non-destructive editing coupled with bezier precision makes for some mighty fine work ![]()
Do you have your own suggestions or techniques? Feel free to share in the comments section below and +1 / RT if you enjoyed.


")