


Incredible Horror Photomanipulation Photoshop Tutorial
Horror is an incredibly popular genre of art, and it ranges from just dark and spooky to visceral and macabre. Photomanipulation is the easiest way to create horror digital artworks, although digital painting is a close second.
In this Photoshop tutorial, you’ll learn how to create an incredible horror photomanipulation. Starting with a bright and sunny day stock image, you’ll see how to turn it into a scary scene straight out of a scary movie.
Enjoy.
Tools used:
- Adobe Photoshop
- Various stock images
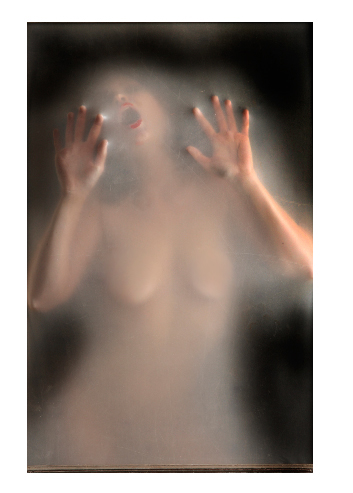
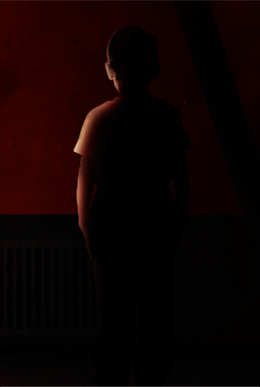
Final Image Preview

Step 1: Scene setup, background creation
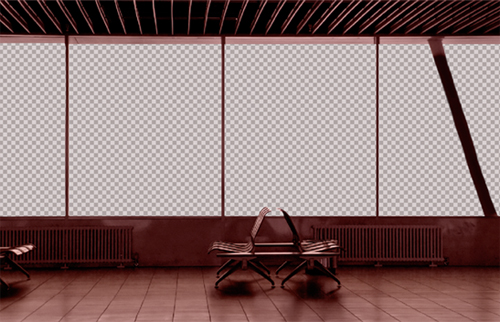
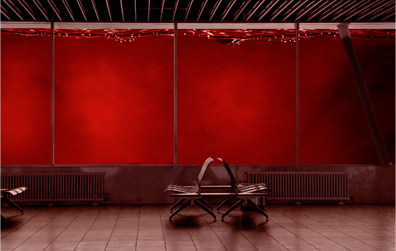
So to start off we will need a base stock. This can be a window in a room, a fish tank, a mirror etc… I will be using the windows at an airport terminal but you can use whatever you like. But when selecting your stock be sure to keep the size in mind, we always want to work at a decent size resolution, for example im working in 3000x2000px. My airport terminal stock is from Shutterstock and looks like the below screen shot.

Now we need to isolate out the windows from our stock, if your using a stock similar to mine (a window, mirror etc…) you can do this easily with the marquee tool. So just go ahead and isolate out the area that will become your blood filled section. Once you have don’t that go ahead and do any corrections you see that are needed, for instance I removed the tree by clonestamipng it.


Now we need to grey scale the image, to do this just press Crtl+Shift+U on your keyboard. At this point I clonestamped the support beam on the right hand side so it meets the end of the window pane, this should have been taken care of in the last screenshot but it’s a good reminder to you that if you notice anything that looks off go ahead and fix it now!

Once you have isolated your stock and grey scaled the image its time to start laying down the backdrop behind this as well as the start of the atmosphere. To do this start off by creating a new layer and filling it with a dark red, set this layer up as a color layer at 45% opacity. Next we can duplicate the layer, place it under the base stock and set it up as a normal layer with 100% opacity.

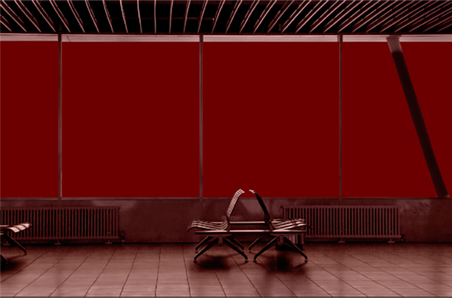
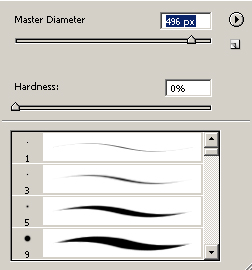
Now we can switch over to our dodge tool which is O on your keyboard. Once you have the dodge tool active go ahead and and set your brush up as mine is in the below screenshot. You want your dodge tool to be set at mid tones with a % of about 45%. Next just dodge the inner sections of each window. Be sure not to overdo it though!


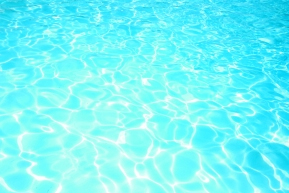
Once you have dodge accordingly its about time we start throwing down a few textures. Our first ‘water’ texture can be found on Sxc and is located here
Once you have dropped the stock into your scene, you just want to grey scale it, clonestamp it so it fits and set it as an overlay layer with an opacity of about 20%.

Now we can repeat this process with another texture on Sxc this one being located here


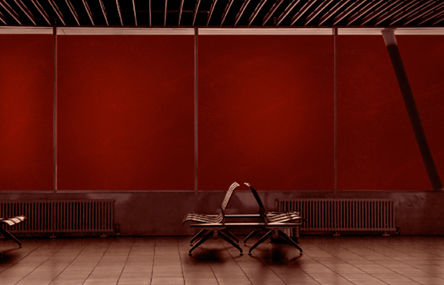
Once our textures are layed down its time to make some more atmospheric effects, to do this we will be adding in a photo filter layer. Photo filter layers can be found in the layer drop down menu under new>adjustment layers. Once you have selected photo filter from the drop down go ahead and set the dialog box up as mine is in the below screen shot and hit ok.

Step 2: Blood area and atmosphere continued manipulation
Now its time to go back to our blood section and start making it look more fluid and blood like, to do this we need to employ another texture and add some water in.
Ok so to start off we need a new texture, I will be using a close up shot of blood I found on shutterstock but you can use a watercolor texture or anything red and grungy for this. Once you have your stock you need to just clonestamp it to fit and place it behind the base stock and on top of the red layer we created previously created. Once this is done we can set the layer up as an overlay and move on to the next step!
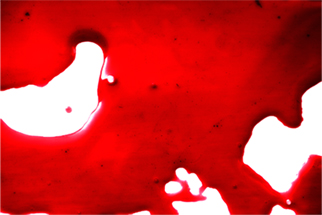


After placing my stock and setting it to overlay at 100% it my scene now looks like the below screenshot.

Now its time to add in some waves/water to make it appear more fluid, I will be using a stock image again, from shutterstock to do this but you can use the link below the next screenshot as a replacement.
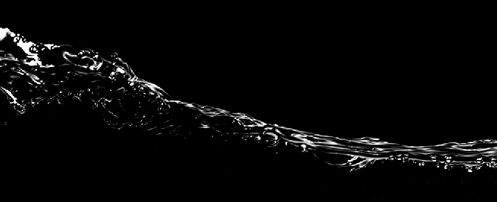
http://www.sxc.hu/photo/1185177
If you use the replacement stock, or another stock similar you may need to isolate out the water. The best way to do this is to use your level adjustment to darken the scene and paint black over any sections you do not want in the final. Once this is done just drop it in as a screen layer!
So now that you have your water its time to drop it in! So choose whatever side you like and start dropping it in! I think the best way to do this is to do it in sections (if your scene is like mine) where each window pane gets its own water stock layer.
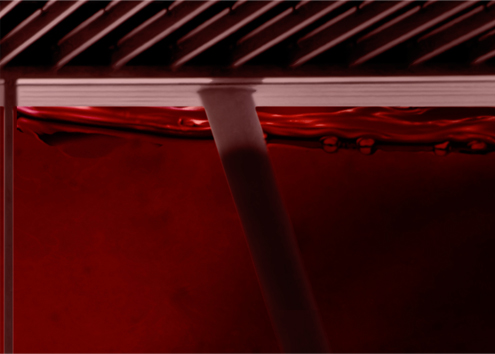

Now this is important, as you can see in the above screenshot my water is darker on the right hand side. Why? Well this side is the side that will be in shadows and since water is a reflective substance when in shadow it should not be as bright as it is in light. So how do you create this effect? You can burn the water or turn the opacity down, whichever works best for you!
Once all the waters down my image looks like the below screenshot.
Now lets create a new layer above the base stock and then grab our brush tool, we want a large LOW opacity brush that has a softness of 0%. The opacity for my brush is set to 25% and yours should be set to a similar opacity. Now just grab a bright red, dark red and black and paint over the base stock, you can do this very roughly and quick, just be sure the dark red is in the middle and the black/red are on their respective sides. If you aren’t that good and painting it into a gradient you can just simply apply a Gaussian blur with a radius of about 250px once you are done. Once your satisfied go ahead and set this layer up as a overlay at 60%.


Next we can grab our gradient tool and create a normal black to white gradient layer under this layer (but on top of the base stock) and set this layer up as an overlay layer with an opacity of about 50%. Just make sure the white/black are on their respective sides!


Now its time to create a new photo filter layer, this time place the layer above all your other layers in the scene.


Once that’s done grab your original base stock, duplicate it and set it to overlay at 55% opacity, place this layer right over the base stock layer so the red/gradient/photo filter layer are all over it.

Step 3: Stock implementation
Now its time to begin our implementation of stock, to start off we will be working with hands. I will be using a sheet of hands from shutterstock but you can find hands really just about anywhere, in fact Deviantart has a huge selection of hands located Here
Once you have your hands you will need to isolate them out and then we can continue on.


Once your hands are isolated out and ready to go you can drop them in your scene under you blood texture layer. Now there is a few ways to go about placing them, you can use a few blending modes such as, screen, overlay, soft light and normal. If you look at the below screenshot going from left to right the hands are screen, overlay and soft light. Now these are the modes I used because it gives the appearance of being submerged and it works nicely. But keep in mind that you will need to vary the opacity when doing this, also try to experiment for example I have some hands that were inverted, just play around with the three blending modes and their opacity, hue and levels when placing them. You want them to appear as if they are really behind a thick fog of blood.
These are only overlay hands at varying opacities.

An inverted hand placed as a soft light layer.
Now just start mixing and matching until your bottom of is filled full of hands!

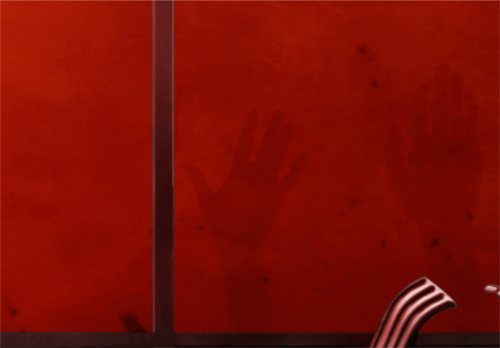
My scene now looks like the below screenshot.

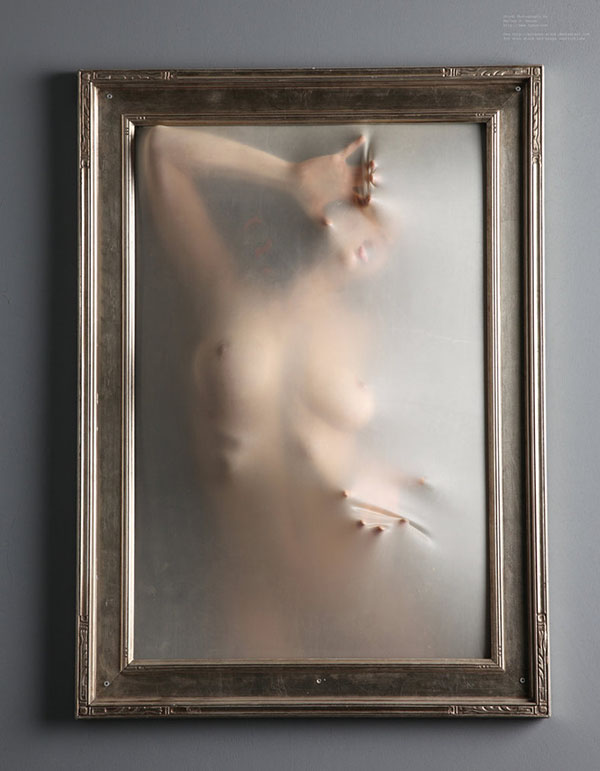
Now we need to bring in some large figures. To do this we will be grabbing some stocks from DA provided to us by the wonderful Mjranum.
Our first stock is located Here
You will want to drop this into your scene and then erase everything but the inside of the frame.


Next we can grab our burn tool and burn the right side of the image softly removing the bright white sections. Then we can open our level editor (CTRL L on your keyboard) and tweak the settings like I have in the below screenshot.


The stock image now looks something like the below screenshot.

Now we just need to place it in the scene as a screen layer and tad a, you can use this image more than once, as you can see in my scene I dropped in the initial layer, free transformed it, moved it and placed it again. You can even erase everything but the hand and use just it!


Now just repeat this process with the other two images in the series provided by the marvelous Mjranum.

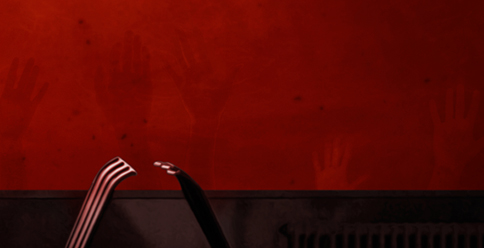
Once you have dropped them in and played around with them until your satisfied we can continue on. My scene now looks like the below screenshot.

Now we need to add in our child. So you will need a stock image of a child or and adult if you like. Either way, child or adult, you need to simply isolate them out and then we can continue on. My stock image looks like the below image and is found on shutterstock. I had to duplicate the right hand side of the child and flip it over so he was grabbing at nothing but if you use a different stock this may not be needed, however if you see anything you don’t like about it, now is the time to take care of it!
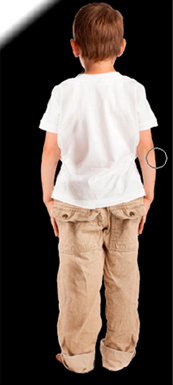
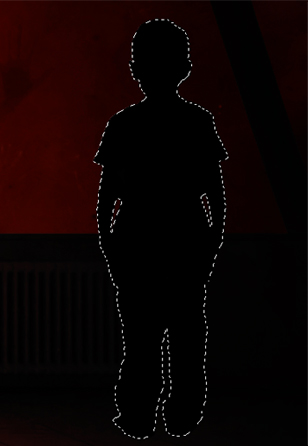
Once dropped into your scene, grey scale your figure, create a new layer and fill the new layer with black. Once your new black layer has been created erase anything that is not over your figure. Next we need to grab a large soft eraser (I used the 300px soft brush) and erase a tiny bit of the side facing the light.

Now just replicate the effects we applied to the scene (color wise) to your figure.

If you look at my image, my child fades into the shadows, if yours does not, be sure to add a shadow in!

Now its time to add in our shattered glass, the stock images we will be using for this are located on Cgtextures. So head over to Cgtextures and grab this stock image
Once you have dropped it into your scene just drop it in as a screen layer directly beneath the base stock and viola your broken glass is done! I did this with a total of three stocks, the other two can be found here:


And now we are finished! I finished off my scene by adding a few blurred skulls and what not but you don’t have to. You don’t have to stop here either, you can add in blood leaking from the cracks, floating bits or whatever you like! In the end its your piece! My final image looks like the below screenshot.
I hope you enjoyed reading this tutorial and it has helped you understand a few concepts or at least showed you some techniques you did not know! Also if you have any ideas for future tutorials, question or just general comments don’t hesitate to drop a comment!


