


Beginners Guide to Designing Print Media in Photoshop
Designing artwork in Photoshop that you intend on printing? Are your Photoshop images printing out blurry and of poor quality? Web graphics differ greatly from print media; we will teach you everything you need to know in order to print out crisp graphics from Photoshop.
Web Graphics vs Print Media
Most new designers fail to understand the difference between designing graphics for strict digital use (web graphics) as opposed to designing print media. Web graphics most commonly consist of banners, logos, web templates, icons etc. that will never see the light of day on paper. Print media on the other hand should be designed specifically for high quality printing. Some common items you may design in Photoshop and end up printing are business cards, flyers, advertisements, and letter heads.
DPI / Resolution
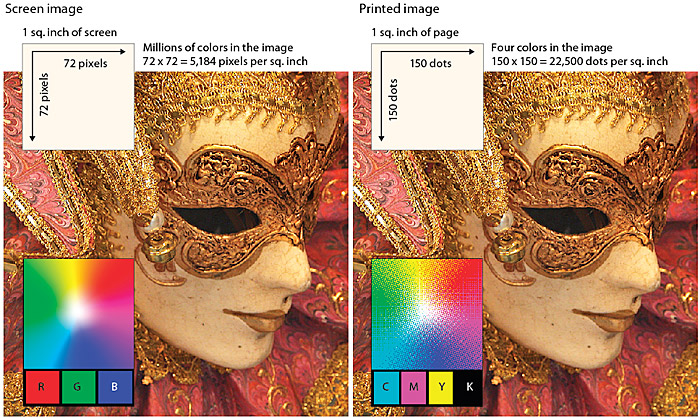
Failing to set the correct dots per inch (dpi), commonly known as resolution, before you start working on your design is the most common mistake designers make. When you open up a new canvas (document) in Photoshop by going to File > New, the first window that pops up has a field for resolution, which is usually set by default to 72 pixels/inch. This value is telling us that there will be 72 dots (i.e. pixels) for every square inch of the document. 72 dpi is ideal when viewing graphics on a computer screen, however when you are printing a design out on stock, 72 dots per inch is not enough, and will usually result in your graphic looking blurry and pixelated. As you’ve probably already figured, increasing the dpi will result in a higher quality image. For most printing purposes you will want to set the dpi to 300 pixels/inch to obtain a good quality print.

The downside? That X by Y dimensions image that you just entered into your document that took up say 80% of the canvas, will now only take up say 20% of it. Why? This is because you have set the document to contain more pixels for square inch, as such, that X by Y image is still X by Y in dimensions, but now has a much lower resolution compared to your high resolution document/canvas thus ends occupying only a smaller space.
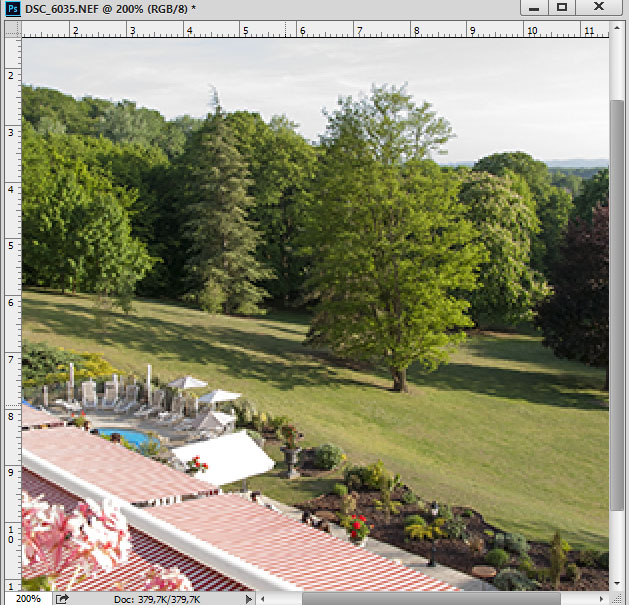
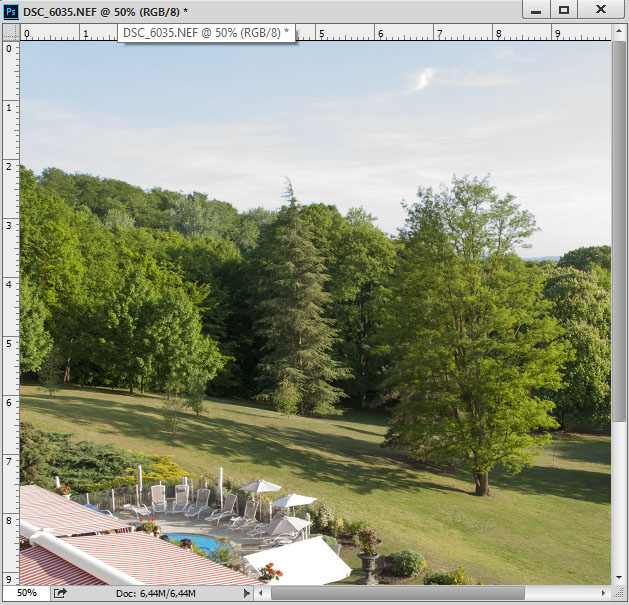
This is shown the images below. The same stock images is placed in a 5” x 5” canvas. The first one is at 72 dpi while the other one is at 300 dpi. Notice also that the one at 300 dpi has a much larger file size.
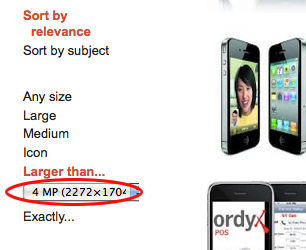
Thus as you are starting to realize, to obtain high quality print outs, the images you use have to be of high resolution themselves, translating directly to higher dimension pictures. For example that 300 x 300 px image you pulled of a Google search will end up being a tiny little spec on your 300 dpi canvas. Sure you can expand the image, but you will just end up degrading its quality. The solution is to find larger images. For example, if you obtain an image off Google that is 2000 x 2000 px, it will take up more space and you most likely wont have to stretch it out. Google image search actually has a built in filter that will let you search specifically for larger files.
Dimensions
When making graphics for web, you usually set the dimensions in pixels. For print media however, you will want to set the dimensions based on the physical stock you will be printing to. So if your flyer is 6” x 4” you will want to set your canvas’s dimension to 6 x 4 in inches (plus the bleed margin which we will explain in the next section), not pixels. This is because after setting a higher DPI, the notion of pixels becomes irrelevant to document size, especially when you are printing it out. If you set the DPI to 300 as opposed to the default 72, your document will now have more pixels per square inch. Thus a 6” x 4” document at 300 dpi will have a larger dimension in pixels as opposed to a 6” x 4” document at 72 dpi which would have a much smaller dimension in pixels.
Bleed Margins
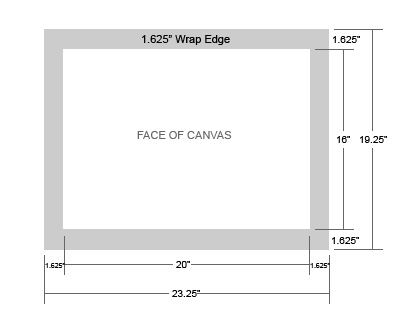
No printer in the world will print your design to the exact dimensions you specify. More than likely, you will lose some data at the edges of your document. This is compensated for by over printing and then cutting to the required dimensions.
To recognize the bleed margin there are two margins you will want to set up. The first margin is the cut line, which is the exact dimension of your media, and as the name suggests, is where the stock will be cut. The other margin is the safety line which is an eight inch in of the cut line. All important data such as text should be inside the Safety line.
Your Photoshop canvas will end up being an extra eight inch off the cut line (exact dimension) thus you will always add a quarter inch (0.25”) to the height and width of your canvas.
Lets take a standard business card which is 3.5” x 2” (exact dimension).
Canvas size: 3.75” x 2.25” (the dimensions to use when you create a new document in Photoshop)
Cut Line: 3.5” x 2”
Safety Line: 3.25” x 1.75”
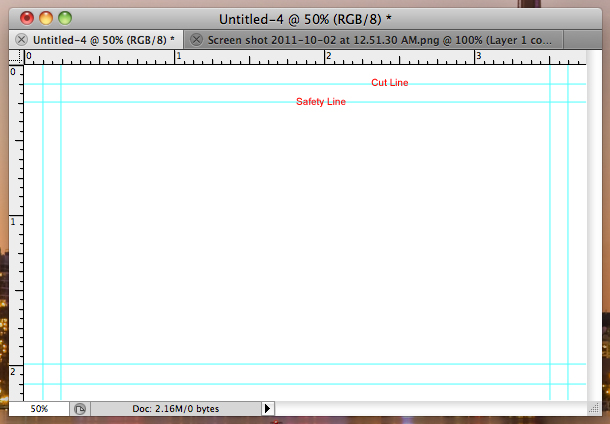
To help you visualize all this while you are designing, you can set up rulers in Photoshop.
Start by creating a new document, and add 0.25” to the exact dimensions. Go to View > Rulers to turn on the ruler. You will want to insure that it is set on inches (unless you are accustomed to mm) by hitting Ctrl + K to open up the Photoshop Preferences window, selecting Units & Rulers and insuring the units is set to inches.

Next click within the ruler area (off the edge of the canvas) and drag out the rulers as shown:
Color Profile

Be aware, the colors you see on your computer screen will most likely not be the exact same colors you see on paper. This is for several reasons, and may even depend on what stock you choose to print it on. This is especially problematic for dark designs which may be viewable on a computer screen but will barely show on paper. Also, some printers may not pick up on lines in your design that are too thin. As a rule of thumb, always print out a sample prior to printing out large quantities.
The best color profile for printing is CMYK and should be set in the New window settings.
File Format to Export To
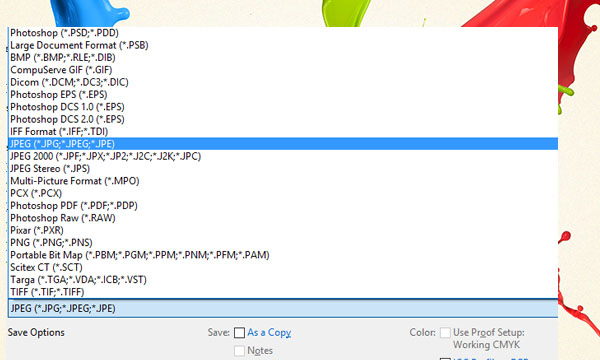
Although you have several file formats to choose from when it comes to exporting your design, the easiest format to go with is an Photoshop PDF. The problem with choosing an image format such as jpeg is that it is measured in pixels and as we explained earlier, depending on what resolution you choose the pixel dimensions will vary. Thus whoever is printing your image will not know exactly what physical dimensions you designed for. A PDF however will fix the physical dimensions to match what you defined earlier in Photoshop. With a PDF, pixels will not come into play.
To save a PDF, simply go File > Save as > and select Photoshop PDF in the drop down menu.


