


Parrot Design with Dispersion Effects in Photoshop
Custom brushes can often be utilized on top of existing stock images to create a matte dispersion effect, where the vibrancy of the original stock is enhanced, while adding artistic flair and visual interest using dispersion. It helps take standard stock images and can be used to create melting effects, shattering effects, and even disappearing effects.
In this tutorial, you’ll be taken through, step by step, the creation of some custom brushes, and application of them to a stock image to create a matte dispersion effect. You’ll learn how to create and save brushes, utilize complementary colors, and manipulate stock images for a visually stunning final result.
Hopefully you like the tutorial, and as always, show us your results in the comments, ask us questions, or even suggest a tutorial. We’re here to help you grow as a designer however we can.
Tools used:
- Photoshop CC
- Stocks
- Scanner (If you have one, works for custom brushes, not required.)
Final Image Preview:

Step 1: Creating custom brushes
Alright so we will start off by creating our own custom brushes to use, if you have your own or a set you downloaded go ahead and use those; if not head ever to http://www.freeimages.com and grab this splatter: http://www.freeimages.com/photo/i-would-really-like-it-if-you-send-me-your-1569732 Do note that to download the stock images from Freeimages you will need an account. They are free so if you don’t have one go ahead and set it up so you can follow along. Once you have downloaded or copied the image open up Photoshop and create a new document. Set the size for this new document to 4500x4500px as I have in the below screen shot.

Now this is one big document, but that’s ok, we will be working with different stocks at different resolutions so it’s nice to have some breathing room. Once you have created the document press ‘CRTL+ V’ on your keyboard, this will paste the image we have copied into our document. If you did not copy the image, just go to the file tab and find where you saved it at and drag it into our document.
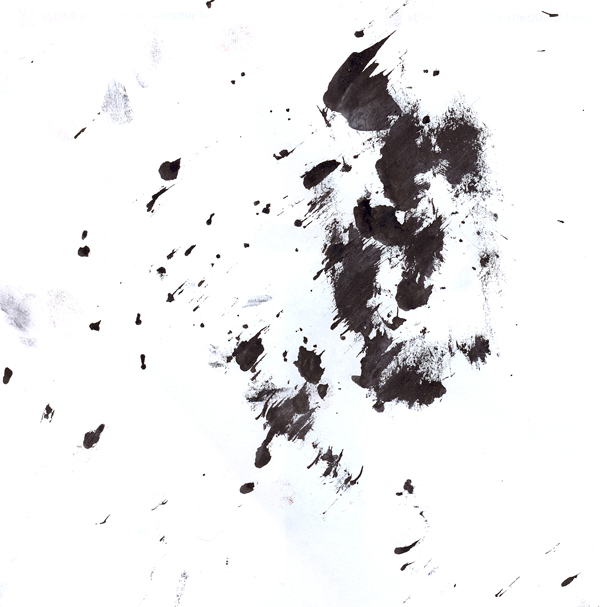
Once the image is in our new document we can start isolating it so we can make a brush out of it. Since the background is white we don’t really have to isolate the image much at all. This will be more of less a cleanup procedure so we won’t have any issues using the brush later on in the image. Start off by pressing ‘M’ on your keyboard; this will equip the marquee tool. Be sure your marquee tool is set to the rectangle marquee and has no feather. Once you have the marquee tool set up properly we will grab the outer edges of our layer as I have, we don’t want any hard edges in the final image or any strange cut offs. Now that it is selected we can just press ‘DEL’ on the keyboard to clear this selection and move on to the next step!

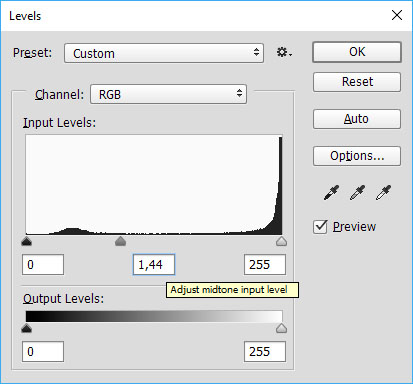
Now press ‘CTRL+SHIFT+D’ to deselect the selection if it’s still up. Once that is done you can press ‘CTRL+L’ on your keyboard, this will bring up the manual level editor. We will not be using the auto level tool for this because we want to keep the majority of the splat semi transparent. Using the auto leveler might cause the grays in our image to become absolute black which would not be good. So with your level editor up slide the middle triangle way over to the black triangle, not all the way though you want to stop at about ‘1.44′. This will cause our image to become much brighter which is fine; it will also help if there are any strange grays around the edges that we cannot see to become pure white. And as I said before, we don’t want any strange edges.
Once you have hit the ok button we will start the final process. That is to remove any last remaining unwanted splats or grey lines that might linger around in the stock image. We will do this by pressing ‘E’ on our keyboard to bring out the eraser tool. Now right click on the screen and a new dialog box should appear; this dialog box will be how we adjust the settings for our eraser brush. Set your brush up as mine is below, don’t be to concerned about the size of the brush the document and image are both huge. Once your brush is set up as mine you can set the opacity to around 45% and eraser along the outer edges of the layer. Try not to erase anything to far to the center of the image, we just want to clean up the image, not destroy it!

We will now grab the marquee tool once again, which is ‘M’ on your keyboard. This time we will select everything we want to become our brush. Remember that everything that is white will become transparent and all that is black will be our brush. With all of that selected press ‘CTRL SHIFT U’, this will desaturate our selection so that our brush becomes black and white.

Go up to the edit tab, located between the file and image tabs, and select define brush preset. By clicking the define brush preset button we will be creating our brush. Everything that is black will be 100% opacity on our final brush, the grays will be around 50% opacity and the whites will not exist. The dialog should look something like mine does, once it comes up type in the name for your new brush and select ok.

Now we can press ‘B’ on our keyboard and select our brush!

Before we get all excited there are more brushes to be made. So we will go back to Sxc and grab this image: http://www.freeimages.com/photo/paint-work-10-1531049 We will paste it into the document the same way we did with the other stock image. However this time since the white is so much brighter and there are no strange outlines our isolation will be much simpiler.

We will press ‘CTRL SHIFT U’ the same way we did before just to make sure everything is black and white. Once that is done we will press ‘CTRL T’ this will bring up our free transform tool. Since the image is much larger than the previous stock image it must be sized down before photoshop will allow us to define it as a brush. Once the free transform tool comes up select the chain link in between the width and height settings so that we do not skew our stock. Now we will just change the size settings as I have in the below screen shot.
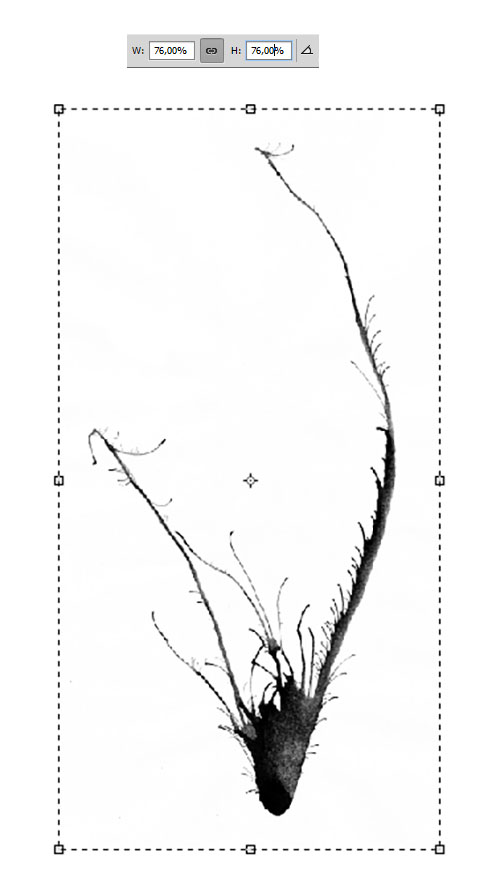
Now that our stock has been sized down we can grab the marquee tool one last time by pressing ‘M’ on your keyboard. This time we will make a very tight selection, keeping the dashed lines as close to the stock as we can get them, this will ensure that our brush does not exceed the size limitations (2500px).
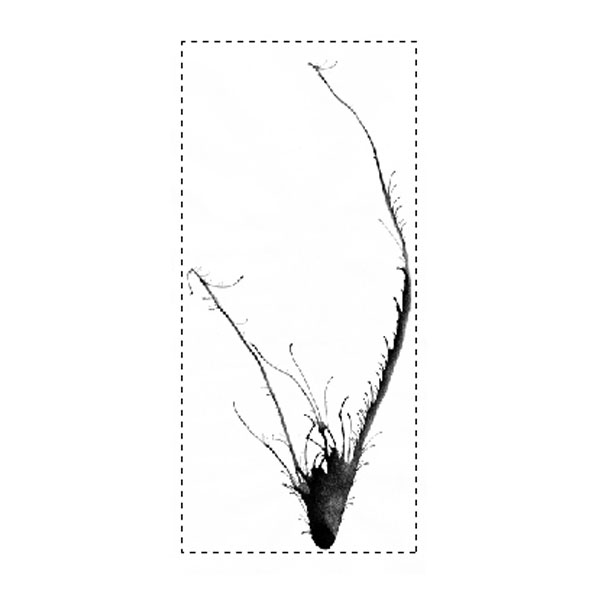
Once the selection has been made we will go back to the edit tab and define our selection as a brush preset.
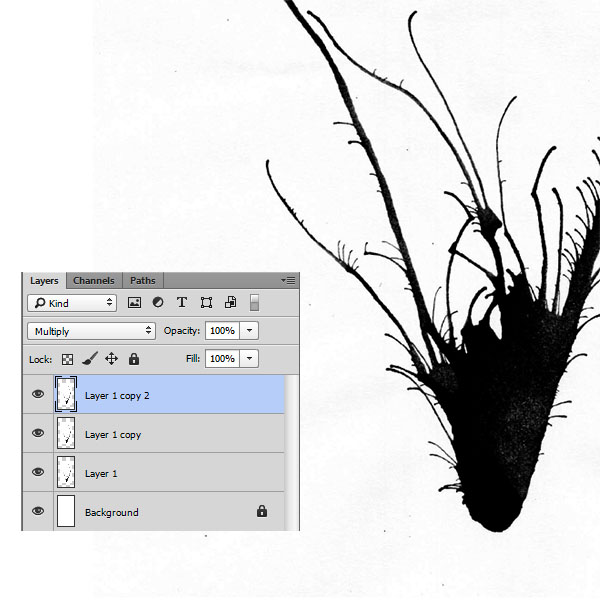
If you really want to create a completely opaque brush you can just duplicate the splat layer twice and set both of the new duplicated layers as a multiply at 100%. This should make the image completely black.
Now we will just repeat this process many times over. If you don’t have a scanner I have provided links to images on Sxc that you can use the same way we have in the above steps. If you do have a scanner you can just throw some paint, ink, finger nail polish, dye or really anything that will dry and look the same way our stocks have. Once you have splatterd or brushed your chosen liquid onto the paper just wait for it to dry, scan it and manipulate it to create a brush the same way we have in the previous steps.
If you are without a scanner here is a large list of stocks, if you don’t want to fool with all of that there are plenty of splatter and brush stroke brush packs around on the net just go looking!
Stocks:
- http://www.freeimages.com/photo/1083404
- http://www.freeimages.com/photo/277790
- http://www.freeimages.com/photo/626005
- http://www.freeimages.com/photo/524461
- http://www.freeimages.com/photo/524460
- http://www.freeimages.com/photo/524478
- http://www.freeimages.com/photo/1192353
- http://www.freeimages.com/photo/902891
- http://www.freeimages.com/photo/826501
- http://www.freeimages.com/photo/1079392
- http://www.freeimages.com/photo/1058438
- http://www.freeimages.com/photo/615813
- http://www.freeimages.com/photo/826508
- http://www.freeimages.com/photo/826507
- http://www.freeimages.com/photo/886378
- http://www.freeimages.com/photo/193172
- http://www.freeimages.com/photo/277771
- http://www.freeimages.com/photo/906249
- http://www.freeimages.com/photo/277759
- http://www.freeimages.com/photo/331123
- http://www.freeimages.com/photo/277805
Step 2: Document setup
Now that we have a whole arrangement of custom made or downloaded brushes we can continue on to the setup for our actual piece. We will start this by pressing ‘CTRL+N’ on your keyboard; this will bring up the new document dialog box. We will use this to setup the width and height for our new document. We will now set our document as 2000x3000px which is a great ratio for a piece like this. This is especially a good thing because once we are done we can size our document down to 800×1200 without any cropping.

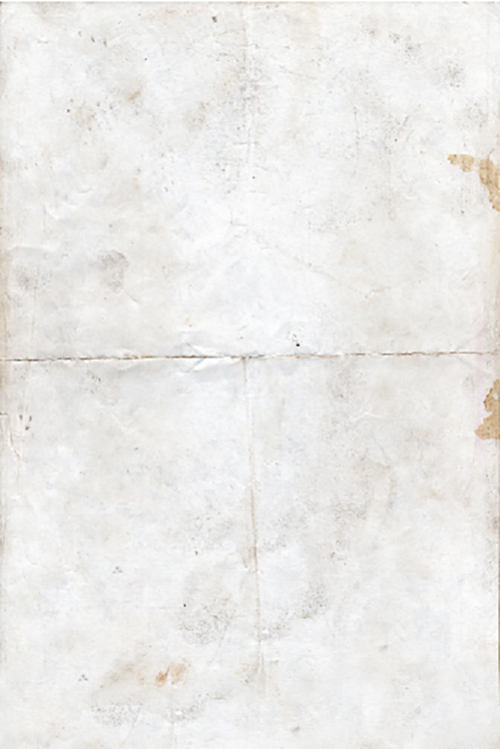
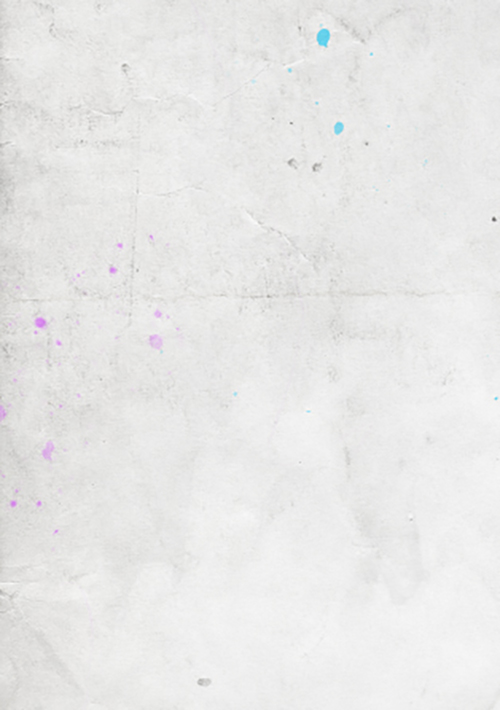
Once our document is up we will head over to Deviant Art to grab a texture for our background. Since we are trying to create something between illustration and photo manipulation we will use a background that looks like a traditional texture. So go to Devianart and copy the image the same we have before and paste it into our document. If you have a texture you have made, found or purchased that you liked more than the above texture then by all means use it, I will be using one I made. Once you paste it into Photoshop make sure the top hits the top of the document and the sides are matching. Your document should look similar to mine below.

As you can see our background doesn’t fit all the way, there’s a big gap at the bottom. We can fix this with the clone stamp tool. The clone stamp tool simply grabs sections of an image and duplicates it where you tell it to. So press ‘S’ on your keyboard to select the clone stamp tool and right click on the document to bring up the brush settings as we have done before. We will be using a similar brush as before this time just a little bit smaller. Make sure you have your hardness set to 0%, this is very important otherwise your duplicated pieces will not blend together due to their hard edges.

Now holding the ‘ALT’ key on your keyboard click on the document around three quarters of the way up and all the way to the left; this is where we will be duplicating from, so any where we click it will duplicate from this area. However once you click the selection we will be copying from will move; this is very good since we don’t want to duplicate the same section over and over again. Once you have held the ‘ALT’ key and clicked we can now go to the left side of the white space and click and drag to the right. If you’re new to the clone stamp tool it might help to press ‘CTRL+SHIFT+N’ to create a new layer once you have selected your start point. That way anything you stamp can easily be done by deleting the layer.
Once you have dragged the mouse to the right you might need to grab a few more locations to just make sure everything blends well. Once you are satisfied with the end result yours should look similar to mine. Make sure you have copied over all of the white on the canvas before you continue though!
Step 3: Stock selection and isolation
During this tutorial I will be using a stock I purchased from ShutterStock, you can by all means go ahead and get it from there site to follow along but if you don’t want to purchase one below is a list of stocks that would be fine to use for this type of illustration.
Stocks:
- http://www.freeimages.com/photo/773565
- http://www.freeimages.com/photo/646027
- http://www.freeimages.com/photo/767518
- http://www.freeimages.com/photo/767509
- http://www.freeimages.com/photo/1003531
- http://www.freeimages.com/photo/1036109
- https://en.tutsps.com//parrot1.jpg
- https://iciness.deviantart.com/art/Parrot-Stock-PNG-402020491
Keep in mind that there are plenty of other stocks out on the net; this was just a short list to help you out. Also remember that this tutorial is not about the stock you use, rather the techniques that the tutorial covers.
Now that you have found a stock we can continue. Depending on your stock selection the isolation process will be different; however I will show you how I isolated my stock and give a few pointers on how you can go about isolation out yours.
Step 3 Continued: Stock isolation
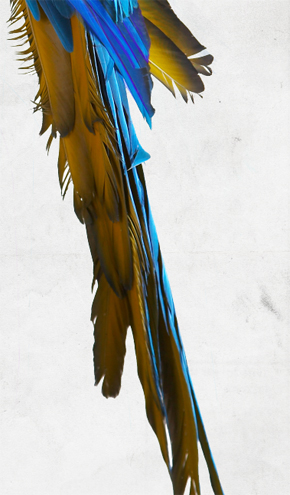
In the below screenshot you will see my macaw (slightly tilted) without any isolation effects.
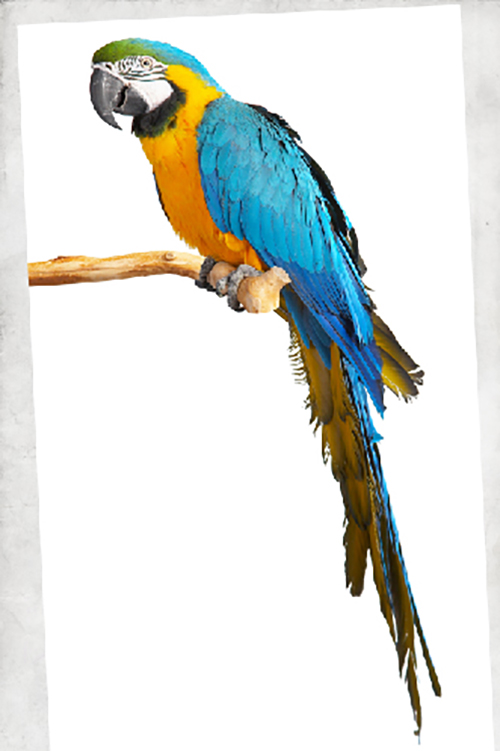
Now I used the magic wand tool with a tolerance of 32 (‘W’ on your keyboard) and selected the white that surrounded my macaw.
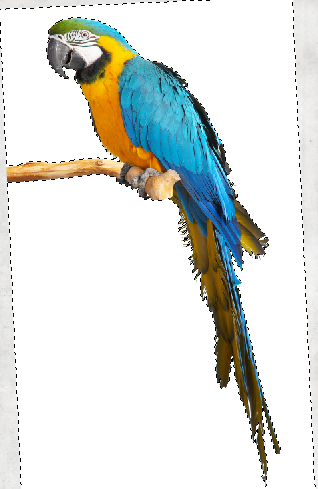
In my next step I created a layer mask based off of my selection. To do this all you need to do is click the icon in your layer toolbar that looks like a square with a circle inside it while you have your current object selected. After the layer mask was applied I inverted the canvas (‘CTRL+SHIFT+I’ on your keyboard) so only the macaw and his branch were visible. I then used a small black brush around 15px with no hardness to clean off any strange areas on the macaw (The brush tool is ‘B’ on your keyboard.). Then I duplicated the layer and removed everything but the branch and placed it beneath my original layer so the branch is now long enough to reach the left hand side of the canvas.
Isolation tips
There is no wrong or right way to isolate an image out. But there are a few things that you should keep in mind when doing it to make the entire process a little simpler.
- Remain isolating the way you always have been, if it works for you then there is no reason to start changing your approach now.
- The magic wand tool/layer masks are there for a reason! Don’t overlook some of the simpler tools Photoshop has to offer just because you think you have surpassed that skill level.
- Stray away from attempting to isolate stocks with severe depth of field! DOF stock photos are great looking, however if your attempting to isolate a stock of a partially blurred macaw, frog or person it will be a thousand times harder than a non DOF stock.
- Back it up! If you are against using a layer mask or the pen tool then you really need to create a history maker during isolation; this way if you make a mistake and don’t catch it in time you will not have to start from scratch.
- Take your time. There is no reason to rush such an important step in the design. I know its cumbersome and quite frankly just irritating most of the time. However getting a great design done but noticing your isolation ruins the piece is an even more irritating process to overcome.
Step 4: Introduction to using custom brushes and creating a matte effect
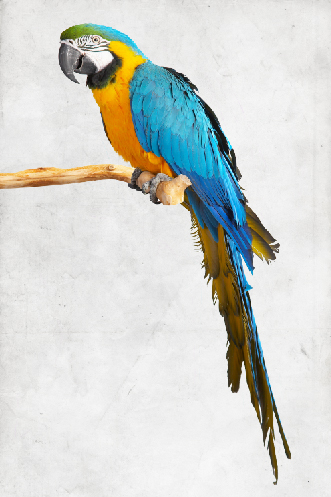
Whenever I do a piece similar to this I always start by choosing my colors (all of them) and painting them on a new layer similar to what a traditional artist does with his color platelet. So start off by creating a new layer; you can do this by pressing ‘CTRL SHIFT N’ on your keyboard. Once your new layer is up just doodle a little bit with each color you will be using (‘b’ on your keyboard will bring up the brush tool) and you know have a platelet!

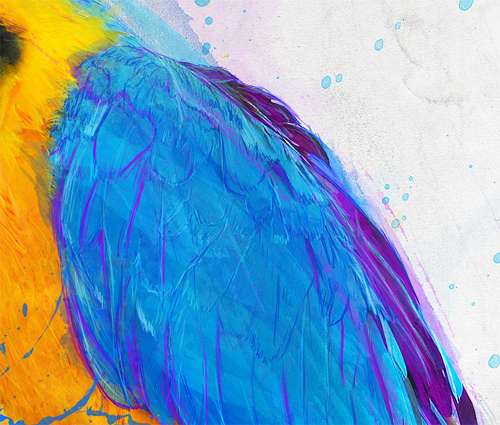
Now we can start using all of those wonderful brushes we created before! I like to start with the largest section of my subject, in this case the blue wing of the macaw. So we will create a new layer by pressing ‘CTRL+SHIFT+N’ on the keyboard and then enable our brush tool by pressing ‘B’ on the keyboard. Once your brush tool is up select which brush you want to use and just paint atop of the major section of your subject! It’s a good idea to keep your opacity of the brush down to about 50-75% opacity because we want to leave some aspects of the subject visible. My result with a 50% opacity brush looks like the screen shot below.
Now we can continue this process a little more. However now we will use just use one or two brushes and try and make it appear as if the splat/stroke or abstract shape is coming off the subject onto our canvas.

Now things are going to get a little bit more creative, we will be trying to achieve a sketch/matte effect. To do this we need to create a new layer by pressing ‘CTRL SHIFT N’ on your keyboard and then we will grab our brush tool (‘b’ on your keyboard); however unlike last time this time we will use the standard 3px hard brush or if its easier for you the 5px hard brush.

Once you have your new layer created and grabbed your preferred brush we will begin. This step will depend on what subject you’re doing, a frog, bird, person or even an inanimate object such as a car. Even thought this step depends on your subject the steps are all essentially the same; we are trying to apply the details back that we took away when we used our brushes.
When reapplying the lost details its always a good idea to try and create realistic lines. For instance if your doing a frog don’t sketch wings on.
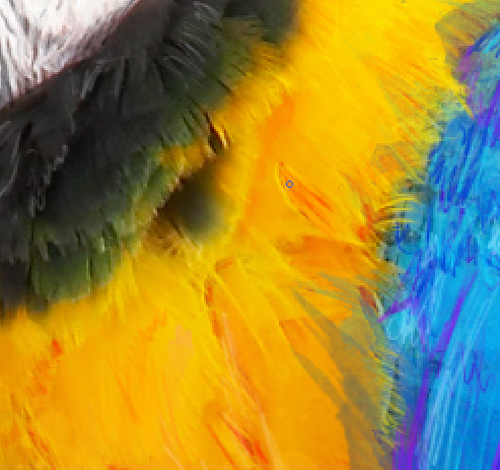
For my macaw I began sketching where I felt the feathers would be along with some shadows/highlights. I used a dark blue for shadows, a light blue for highlights and a purple just for an added bit of color.
Once I fealt that it looked good as is, I went ahead and repeated the same effect on the tail of my macaw.
BEFORE:
AFTER:

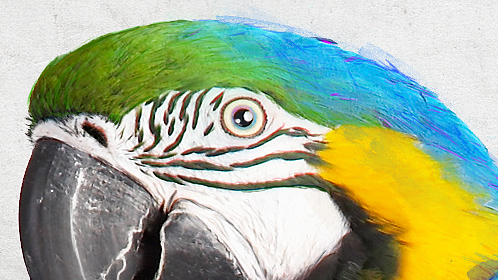
Once that is done we can go back with our small brush (3px or 5px) and matte some more parts of the body. I went ahead and did my macaws head but you can choose another part of your subject.
BEFORE:
AFTER:
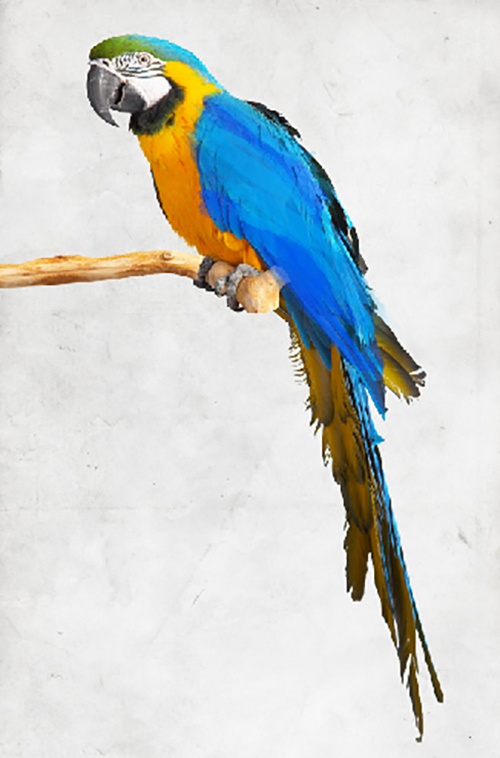
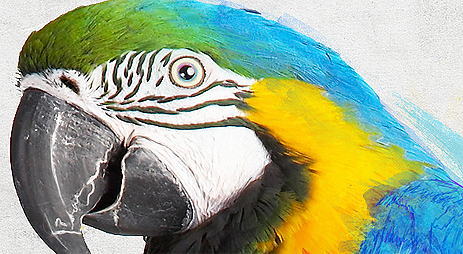
My bird as a whole now looks like the below screenshot.

Matte effect tips:
- Use the smallest brush you can when doing this step, Its important to capture the detail but you want it to look more like a sketch then a speed paint.
- Try different effects with your sketching. For example try doing some crosshatching or stippling.
- Don’t just add details also enhance the natural shadows/highlights of your subject.
- Follow the contours of your subject!
- Use similar or color that will complement one another. You don’t want to use a bright green on a brown surface or a neon pink on a green surface!
- Take your time, even though we are going for a sketch look we still want it to look like we tried! You don’t want some strange box shapes on the subject!
Step 5: Continuing matte and brush techniques
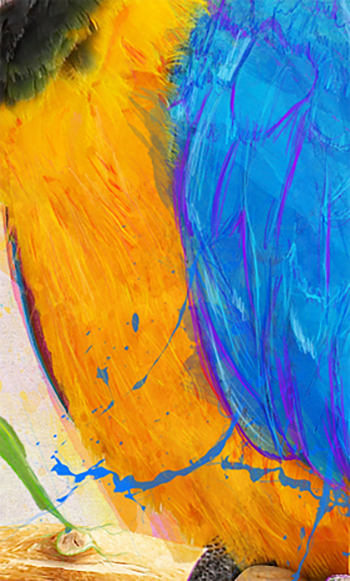
Now that we have started our brushing and matting we just need to continue on. We can start off by adding more brushes below the subject on a new layer, creating the effect that it’s coming off our subject.

I also added some to the opposite side of the macaw around his belly area.

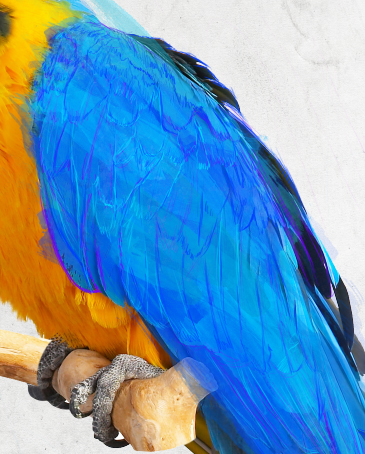
Next we will do something different with our matte effect, this time we will fill in a shadowed area with a color. I choose purple and did the dark feathers on the back of my macaw. The main thing here is to make it still appear as if it were a sketch and not a fill layer. You can tell when looking at my below screenshots that they are not 100% opaque or 100% filled in.
BEFORE:

AFTER:

Next we will use a large splatter brush and paint it atop our figure. Be sure to use a similar color for this so it blends well with your subject. For instance I used a dark blue that would blend with the bulk of my macaw. You will also want to keep this layer at 100% opacity.


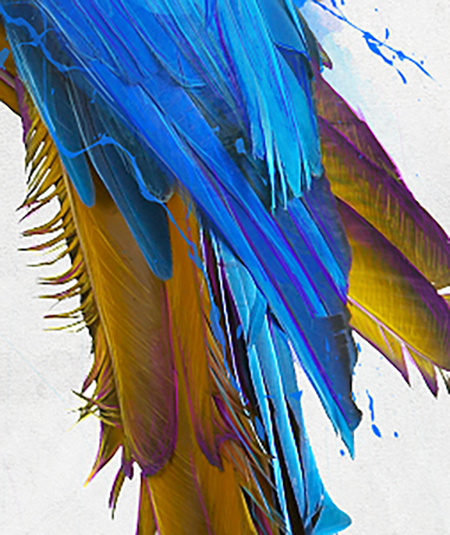
After this was done I went ahead and added some more details with my small brush to some of the missed areas, mostly the belly of my macaw along with parts of his neck/head. It’s a good idea to do this because you may have missed certain spots or may think of something that could be changed or added that you didn’t think about before.
Step 6: Extra bits
You can add whatever you want to at this point to brighten up or add more dynamics to your image; for instance if you were doing a frog you could add a fly or another type of insect to your scene. I added in some leafs to add a little bit of extra detail to the branch as well as help add in some needed color. But make sure whatever you add makes sense, don’t add a car to a macaw scene!

My image now looks like the below screenshot.

Now we just need to repeat all of our above steps of matting as well as applying new brushes until we are satisfied with the outcome. I added more matting as well as a lot more brushes underneath my macaw, specifically splatters.


Step 7: Drips and closing
This step is not mandatory however I feel it adds a little something extra to the finished piece.
To start this you will need to grab your 3px brush once again and then just draw some drips!

No real secret or new technique to learn in this step, just doodle away! My only real technique here is to start wide and end thin just like a real drip, I applied the drips all over my macaw to create a more interesting final image. The below screenshots will show you what my result looks like.

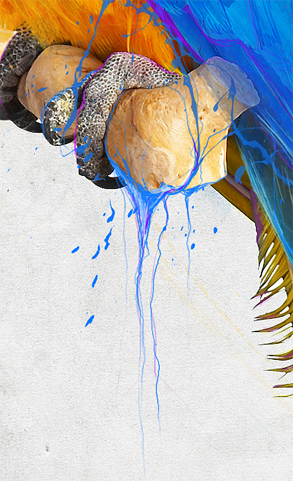
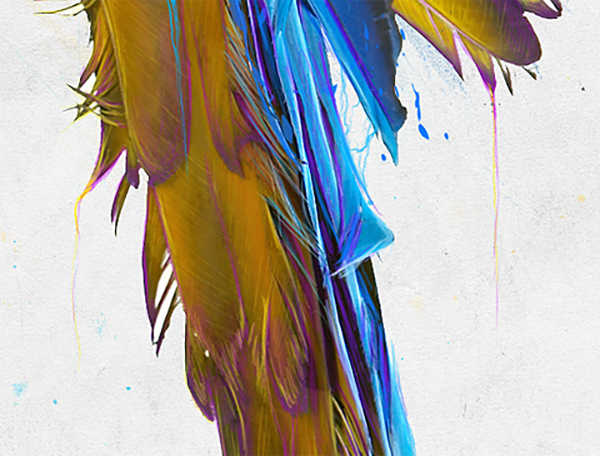
Now we are done! You can size this anyway you want but my closing goes like this; merge the document (‘CTRL+SHIFT+E’ on your keyboard), apply two sharpen filters, decrease the image size down to 800×1200 and then apply one last sharpen filter. My final result looks like the below screenshot.
Parrot Design with Dispersion Effects in Photoshop
Well I hope you enjoyed the tutorial and learned a thing or two about how to create something similar to my dispersion technique and maybe came out with a final piece that you liked!


