


Halloween Photoshop Evil Eyes Tutorial
For part two of our ‘4 Weeks of Terror photoshop tutorial series, we’ll be creating realistic evil eyes with a luminous glow. In a few short steps you can add serious menace to any portrait using Screen layer mode to ramp up the iris. This one works for both dark and bright eye colours – so noone is excluded!! Combine this effect with our other horror walkthroughs and your ‘ reverse-makeover ‘ will get seriously nasty. Read on for the breakdown..
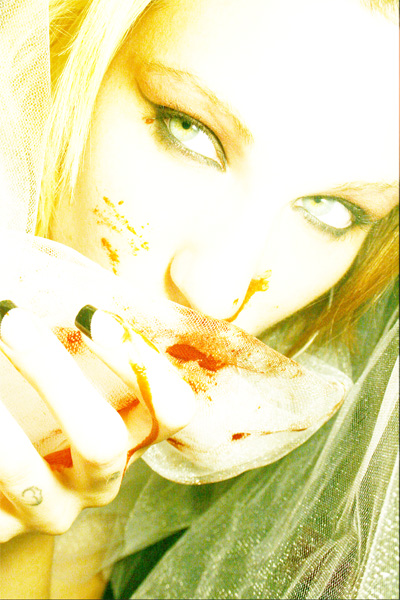
The Stock
For the example, Ive selected a close-up portrait by GlamorousAcid-Stock (DeviantArt) – the framing is awesome and it’s beautifully shot:

Duplicate and Screen
Fire up Photoshop and create a duplicate of your stock image layer ( Ctrl/Cmd + J ). Set this new duplicate to Screen Layer Mode. Duplicate the Screen layer; as many times as it requires, to get your desired iris brightness. Once the iris looks bright enough – click on the top layer, hold Shift and click the first duplicate in the layer stack. This will allow you to select the entire row. Merge all the selected duplicates ( Ctrl/Cmd + E ).

Once you have completed this step, add a layer mask to the merged duplicate layer ( see above ). Your entire image will be affected by the brighten layer you have just created, the next task will be to selectively apply the brightening to only the iris area.
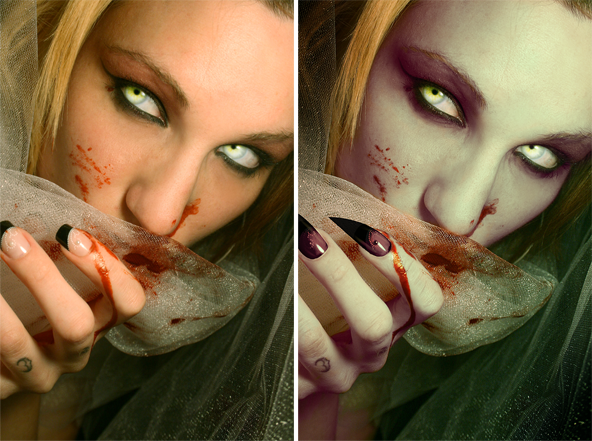
Here’s how the example image looks so far:
Selective Masking
Click on the Layer Mask you created for the brighten layer, and invert to black ( Ctrl/Cmd + I ) – this will hide the layer contents completely. The task here is to selectively paint in the brighten effect using the layer mask, over the iris’; there are a number of different approaches that can be used. The simple method is to use a Soft-Edged Brush (B) set to white, change the brush size so it is roughly the width of the iris and click on each eye.
The method used for the example piece is slightly different. I used the Ellipse Tool (U) set to white and created circles over both eyes. Once positioning was correct, a Gaussian Blur ( Filter > Blur > Gaussian Blur ) set to 26px was used to blur the circles within the layer mask.
In image 2 below, you can see a little cleanup was required. I used a small-width Soft-Edged Brush (B) set to black to paint away the brightness that went over the eyelashes etc. A small brush click on each pupil brought them back to prominence ( pic 3 ).

Finishing Touches
When duplicating Screen layers in such a fashion, you can often get pixel degradation. You can easily remedy this by using the Smudge Tool (40% Strength), and smoothing the iris by smudging outwards from the pupil.
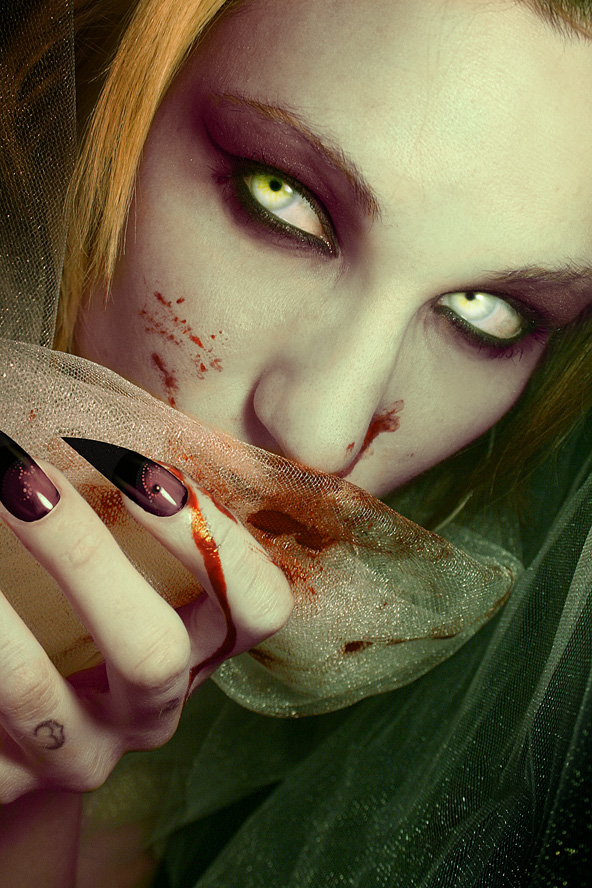
You can also accentuate the eye shadow by painting with black on a new layer set to Soft Light. Ive added a couple of extra adjustments and a bit of colour processing to liven up the image a bit, like so:
Great creepy results with a few simple steps:
Review
That’s it for part 2 – who knows where we’ll go for the next two installments. Be sure to tell your friends and RT if you enjoyed the tut.


