


Create a Realistic Wood Texture in Photoshop
In part I of my series on “creating awesome textures using filters in Photoshop” I showed you how to create a realistic water texture using only 2 filters. In part II of this series I will show you how to create a realistic wood texture.
This tutorial uses a few more filters than the last and requires a bit more finessing, but I think the end result is awesome.
Let’s Get Started…
The first three steps are the same as the water effect. First, create a new document in Photoshop, size it to 500px by 500px, click OK.
Set the Foreground color to white and the background color to black.

Go to the toolbar at the top and click Menu > filter > Render > Clouds. This will give us a nice base to work from. Another good part about this filter is that you get a different result every time you render the clouds, so if you don’t like what you get the first time, just try it again.

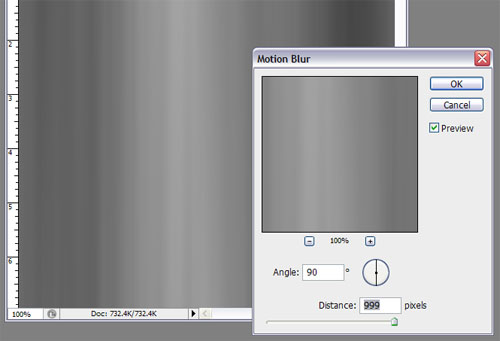
Next up we need the direction of the black and white variances to be more vertical. A quick way to achieve this is with the motion blur filter. So click on Menu> filter > blur > motion blur. Make sure the preview is checked on so you can see what your changes look like, and drag the distance all the way out to 999px and make sure the angle is vertical set to 90 degrees and click ok. You can play around with the distance slider, but after some experimenting I find this works the best. Also you can change the angle to suit your needs, but in this case I want the wood panels to look vertical.
Although we need some black and white variance, we don’t want it so drastically different that our final result looks unrealistic. We can dull it out a little bit by changing the levels. Click Menu > Image > adjustments > levels. Drag the middle slider for the midtones to the left a little until you get the variance you’d like.

OK, now it’s time to experiment with some of the filters a little. Click on Menu > Filter > brush strokes > accented edges. Play around with the sliders, I set mine to: Edge Width 2, Edge Brightness 42, Smoothness 4. These are just tentative suggestions however, because your effect will be slightly different based on the clouds that were rendered.
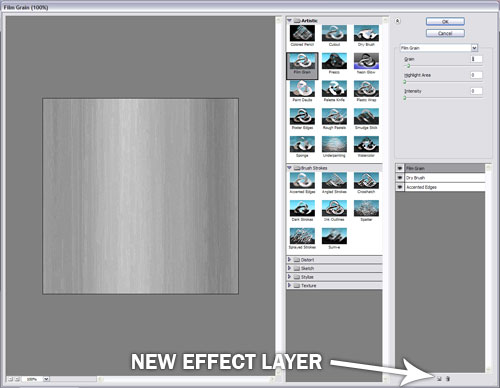
Stay in the filter window and click on the new effect layer icon down in the bottom right. If you are familiar with layers then you should be real comfortable with effect layers. They work in much the same way, and you can play around with which layer goes on top of each other and toggle the “Eye” to hide/show the layer.
In the new effect layer you just created toggle open the artistic filters and click on “Dry Brush. Again play around with the sliders, I set mine to Brush Size 2, Brush Detail 9, Texture 2.
Lastly, within this filter window, we can add a little bit of texture using the film grain effect. Repeat the prior step to add a new effect layer. And within the Artistic filters that you already toggled open in the previous step click “Film Grain.” We want just a subtle amount of noise so I just used 1 for grain and 0 for highlight area and intensity. Click OK.
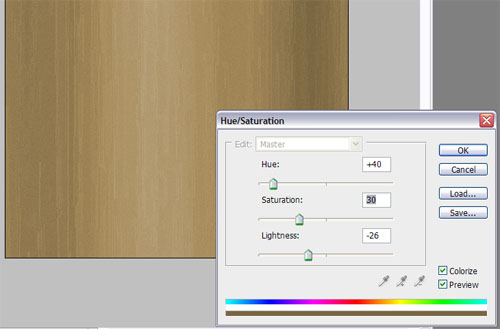
It’s beginning to look more like the grainy wood texture that were after so let’s add some color into the image. Click on Menu > Image > Adjustments > Hue/saturation. Check the colorize and preview boxes and play with the sliders until you get the color you want. I set mine to a nice grayish brown with the following settings: Hue +40, Saturation 30, Brightness -26. Click OK.
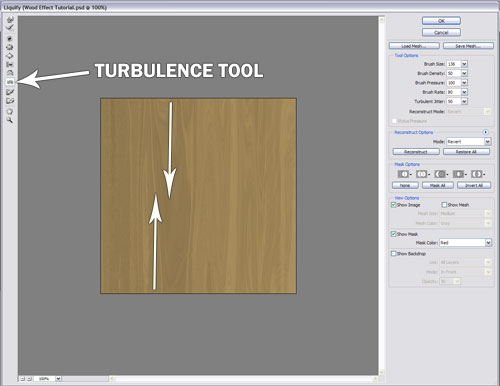
This step is where we really make the wood effect come together. Click filter->liquify . This brings up the liquify window which is complete with preview of the image and a set of tools unique to this filter. The options are almost limitless in this menu. First off, grab the turbulence tool from the panel of tools along the left side. This acts much like a smudge brush, accept it really keeps a lot of the good details. You can vary the size by hitting the bracket keys ([,]) on the keyboard, just like you would a brush. Click and drag upwards and downwards to warp the wood into a more realistic pattern. I try to even things out and make it look like grain patterns as best I can.
Within the same liquify window, select the “Twirl Tool.” It’s with this tool that you will attempt to make the knots in the wood. Again you can change the brush size by clicking the bracket keys, and I would suggest making the knots varying sizes. When you have a place that you think looks like it could use a knot, click the twirl tool brush and hold, as you do so the brush will begin to spin the pixels. Let go when you have a knot you like. If you don’t like the look, click ctrl-z and try it again. Make a bunch of them in the wood and click OK.

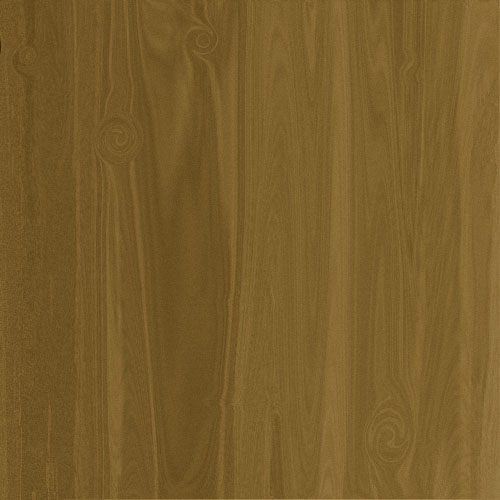
That’s pretty much it. Some other suggestions to improve upon the look would be to play with the levels again, depending upon if it needs more contrast, adding some noise, and playing with the hue/saturation levels again. This is my final product…


